Shadow Box Ideas: Top 10 Most Popular Types to Display Your Memories (2026)
This post may contain affiliate links. If you make a purchase through one of my links, I may receive a small commission at no cost to you.
I've always loved how shadow boxes can turn ordinary keepsakes into stunning wall art. Whether you're looking to preserve military medals, wedding mementos, or travel souvenirs, shadow boxes offer the perfect way to display three-dimensional objects that mean the world to you.
Over the years, I've helped countless people create beautiful shadow boxes for every occasion imaginable. From baby's first outfit to concert tickets from unforgettable shows, these deep-set frames protect your memories while putting them on proud display.
In this post, I'm sharing the 10 most popular types of shadow boxes that people are creating today. You'll discover creative ideas for arranging your keepsakes, learn what items work best in each style, and get practical tips for designing shadow boxes that truly showcase your story.
Key Takeaways
Shadow boxes are deep frames designed to display three-dimensional objects and treasured keepsakes
The 10 most popular types include military memorials, wedding keepsakes, sports memorabilia, baby memories, and travel collections
Proper arrangement, depth selection, and preservation techniques are essential for creating shadow boxes that last
You can create meaningful displays for any occasion, from graduations to family heritage collections
DIY shadow boxes are achievable with the right materials and some creative planning
What Makes a Great Shadow Box Display?
Before we dive into the top 10 types, let me share what separates an okay shadow box from one that really wows people when they walk into a room.
The most important factor is depth. Standard picture frames just won't cut it when you're trying to display medals, baby shoes, or baseballs. You need a frame that's deep enough to accommodate your items without squishing them against the glass. Most shadow boxes range from 1 to 3 inches deep, but some specialty boxes go even deeper for larger objects.
Lighting makes a huge difference too. I always recommend hanging shadow boxes where they'll get good natural light, but not in direct sunlight that could fade photos or fabrics over time. If you're displaying something really special, consider adding small LED lights inside the box or positioning it near a picture light.
Arrangement is where your creativity comes in. The best shadow boxes tell a story. I like to start by laying everything out on a table first, moving pieces around until I find a composition that feels balanced. Don't be afraid to use different heights and layers. Small risers or mounting foam can help create depth and make certain items pop.
Your backing material matters more than you might think. Felt, fabric, or specialty paper in colors that complement your items will make everything stand out. Neutral tones like black, navy, or cream work for almost anything, but sometimes a bold color or patterned background can really make your display shine.
Finally, think about how you'll secure your items. Museum putty, pins, small hooks, and archival glue are all great options depending on what you're mounting. The key is making sure everything stays put while still being removable if you ever want to rearrange things.
Top 10 Most Popular Shadow Box Ideas and Types
Now let's get into the fun part. These are the shadow box styles I see people creating most often, and each one has its own special way of preserving memories that matter.
1. Military Memorial Shadow Boxes
Military shadow boxes are probably the most traditional and meaningful type you'll find. These displays honor the service of veterans and active duty members by showcasing medals, ribbons, rank insignia, patches, and folded flags.
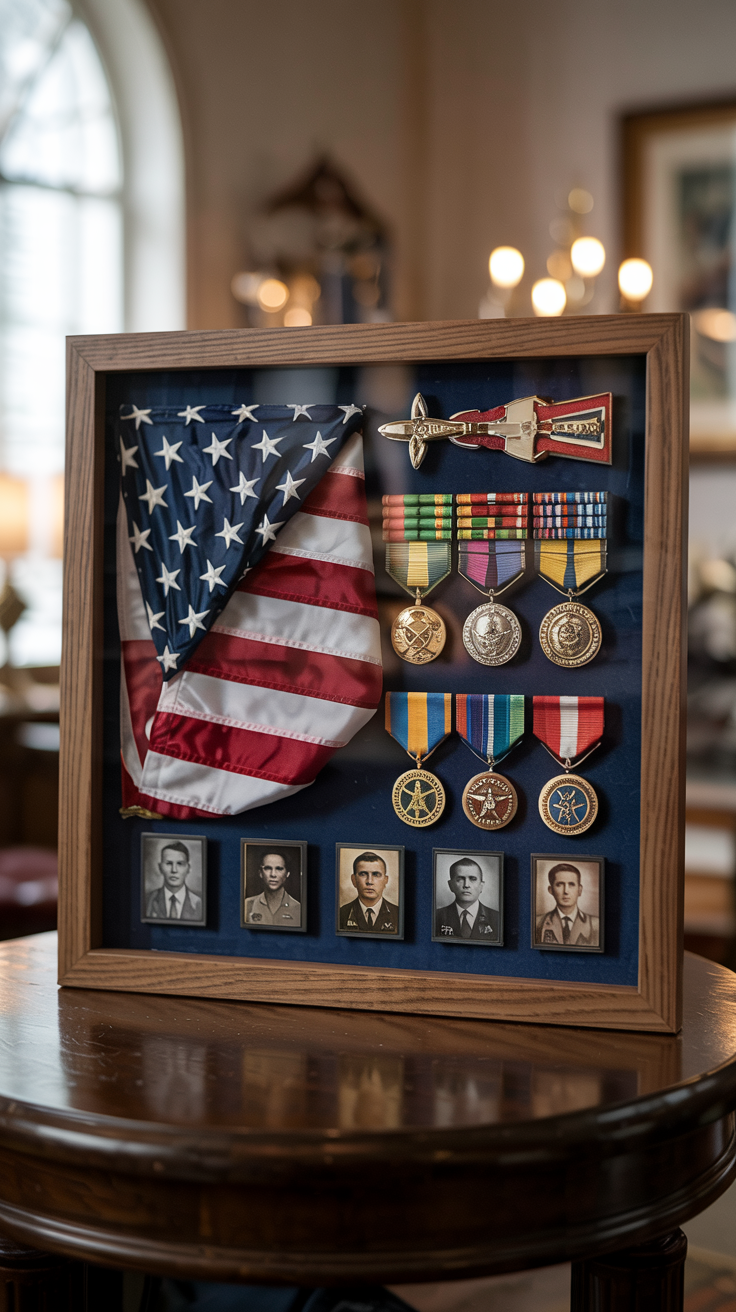
The standard military shadow box follows a formal layout. The American flag gets positioned in a triangular fold, typically in the upper portion of the display.
Medals and ribbons go below in order of precedence, with the most prestigious awards taking center stage. Many people also include photographs in uniform, dog tags, or unit patches.
What I love about military shadow boxes is how they tell the complete story of someone's service. Every element has meaning, from the branch insignia to the retirement certificate.
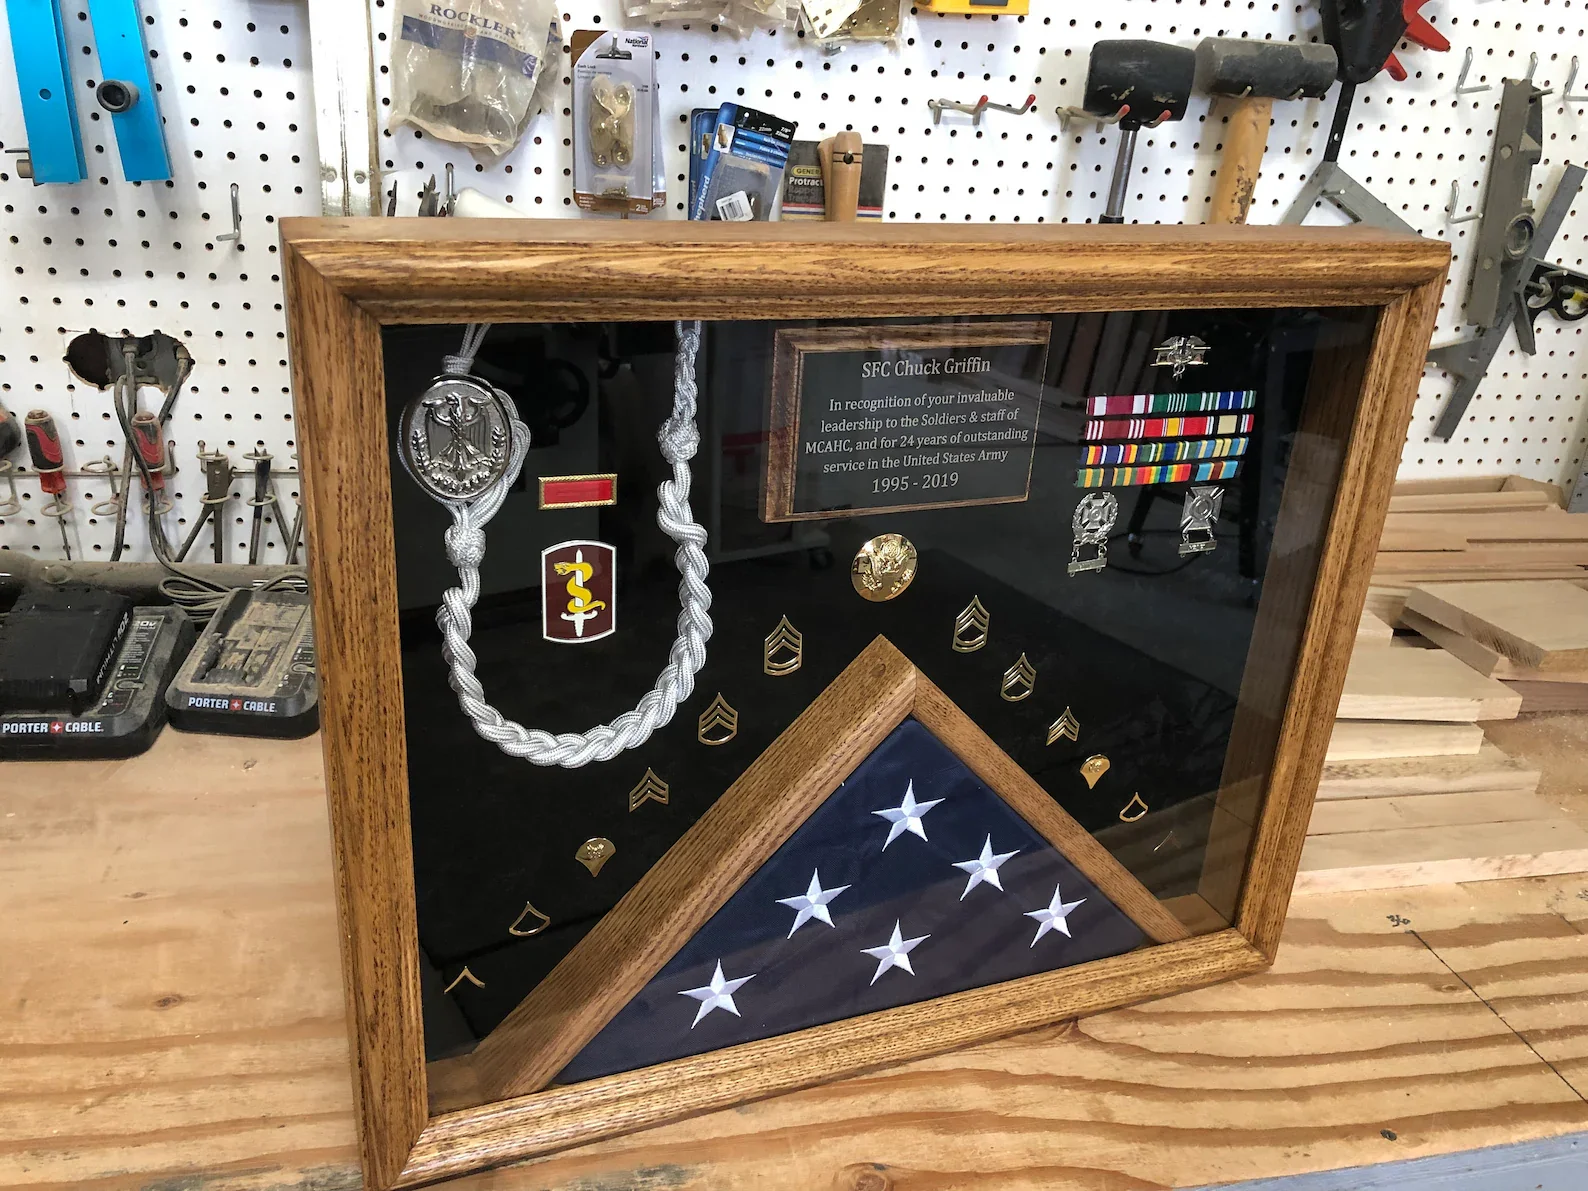
If you're creating one for a family member, take time to research proper placement and protocol. It shows respect for their sacrifice and makes the display that much more special.
2. Wedding Keepsake Shadow Boxes
Wedding shadow boxes capture all those little details from your big day that would otherwise end up in a drawer somewhere.
I'm talking about your invitation suite, dried flowers from the bouquet, a piece of lace from your dress, the cake topper, and those personalized napkins you spent hours choosing.
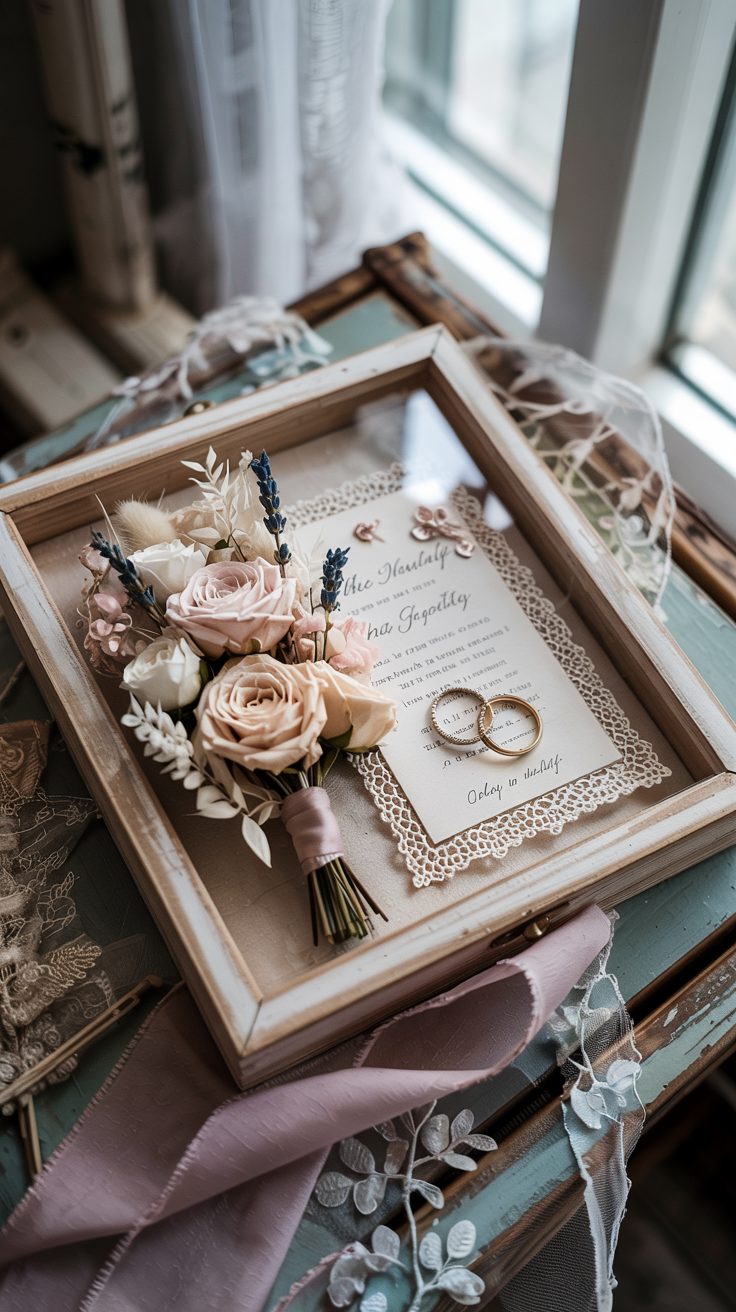
The key to a great wedding shadow box is creating a romantic, cohesive look. I usually suggest using your wedding colors as inspiration for the backing material.
Soft fabrics like silk or velvet work beautifully and give the display an elegant feel.
Don't try to cram everything in. Select your most meaningful items and arrange them with breathing room.
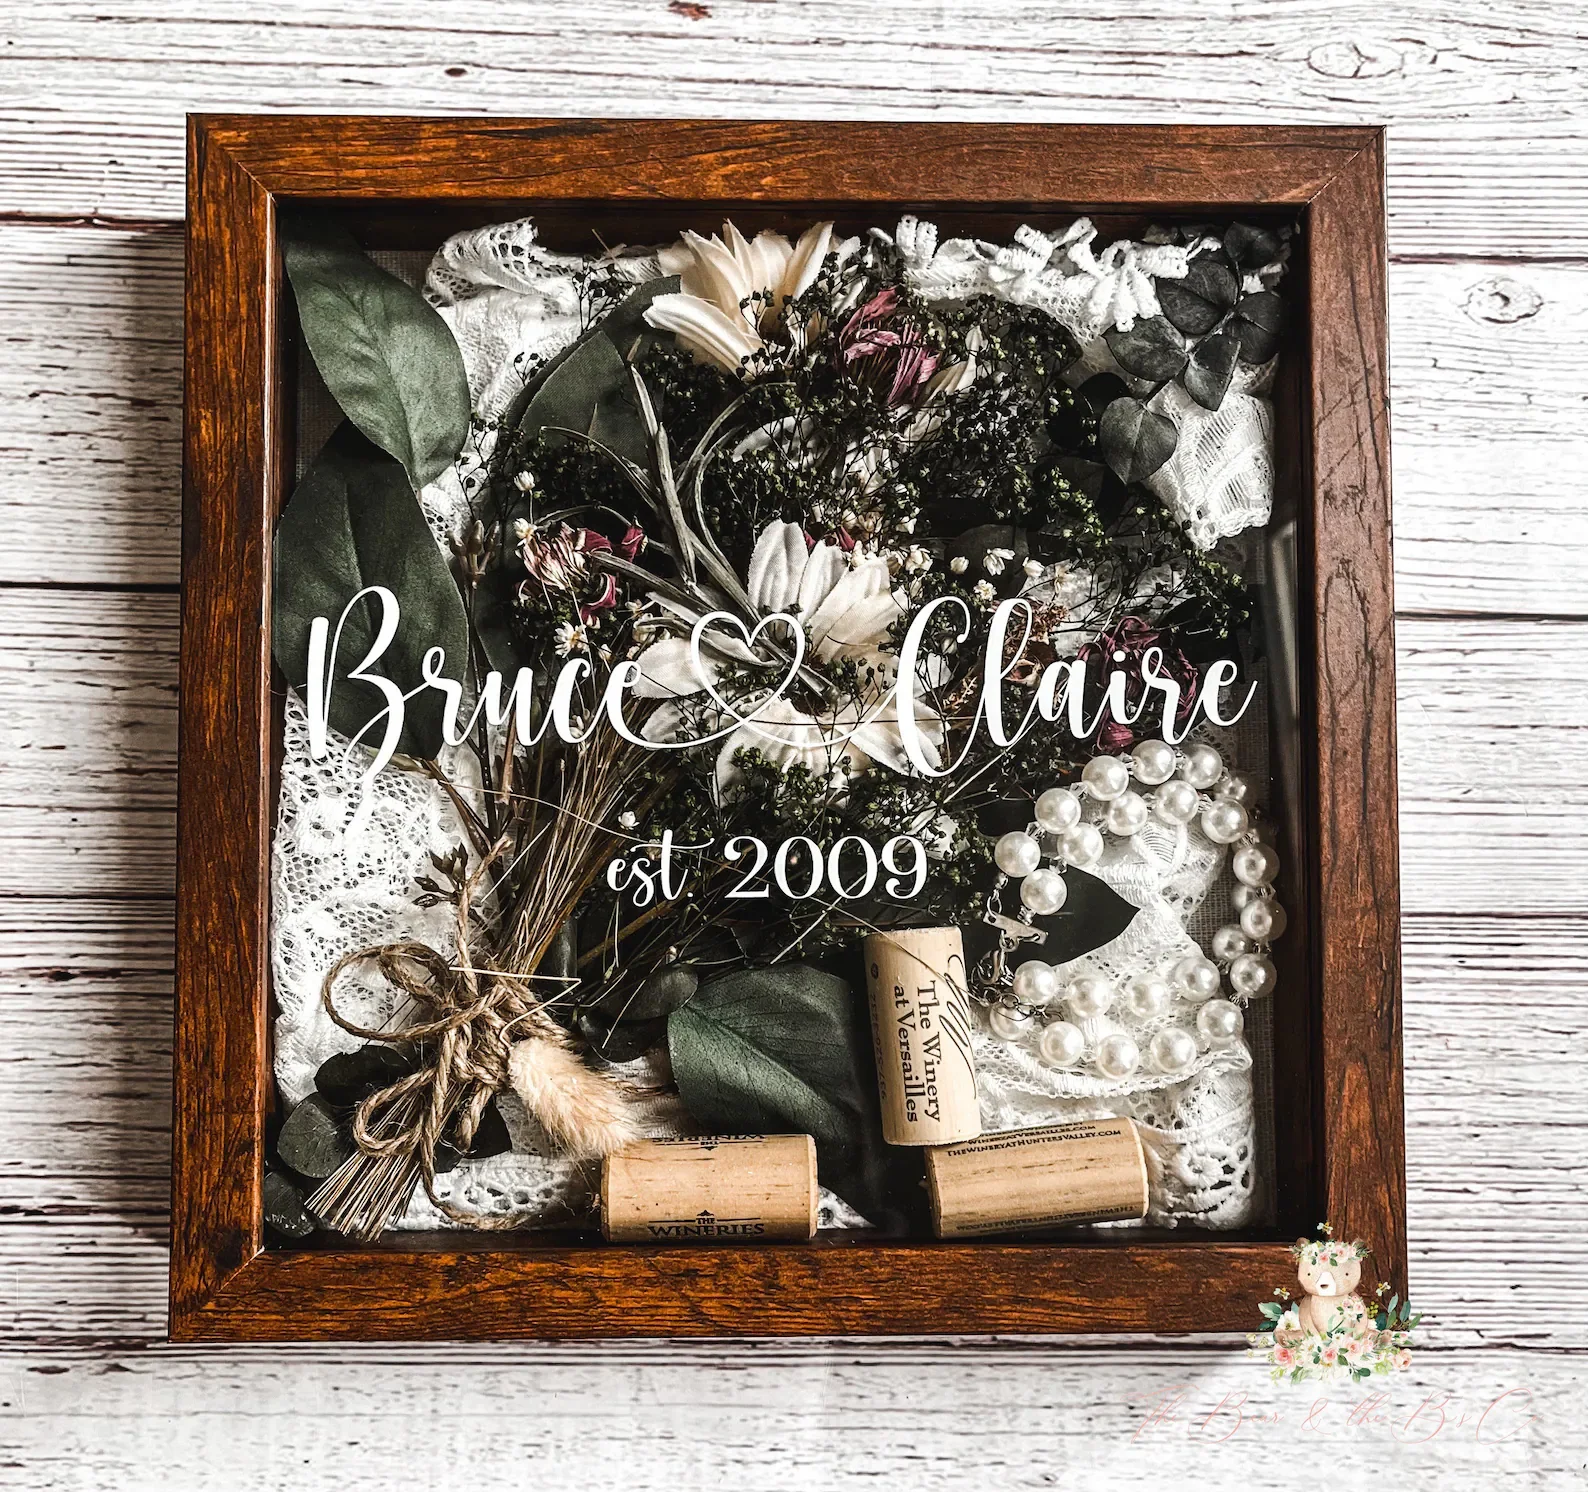
A single pressed rose, your vows printed on beautiful paper, and a photo from the ceremony can be just as powerful as a box stuffed with every detail.
Layer items at different depths to create visual interest, and consider adding small labels with the date or venue name.
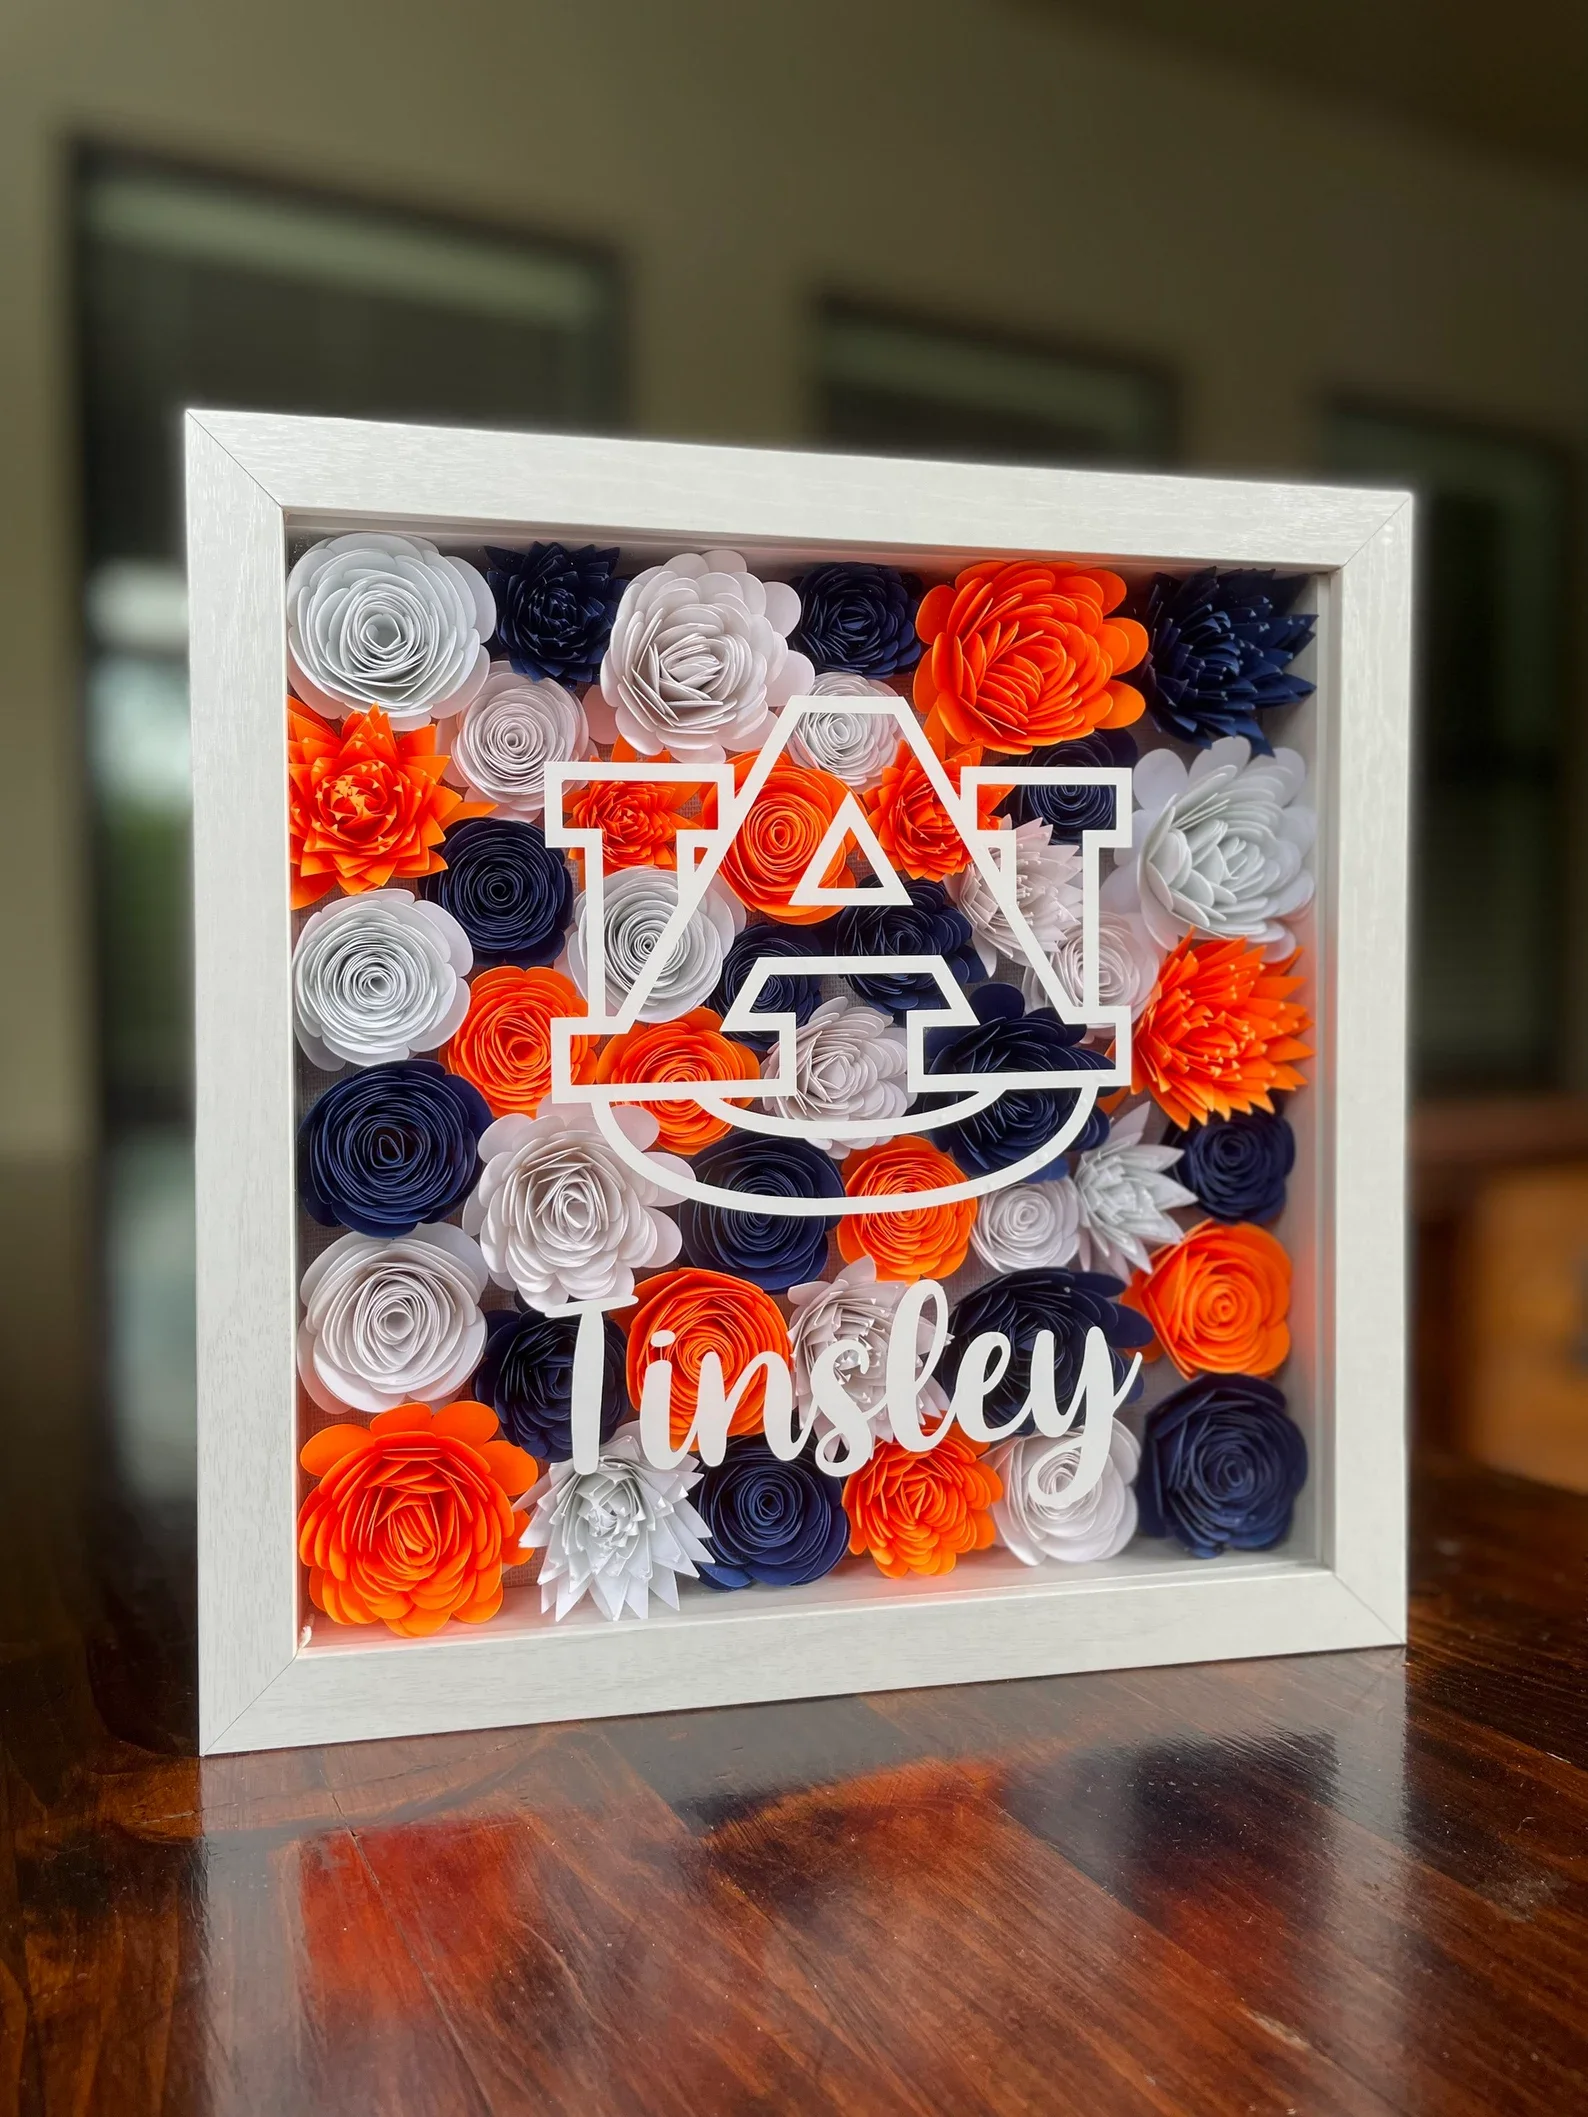
3. Sports Memorabilia Shadow Boxes
Sports fans, this one's for you. Whether you're preserving your own athletic achievements or celebrating your favorite team, sports shadow boxes bring your passion off the shelf and onto the wall.
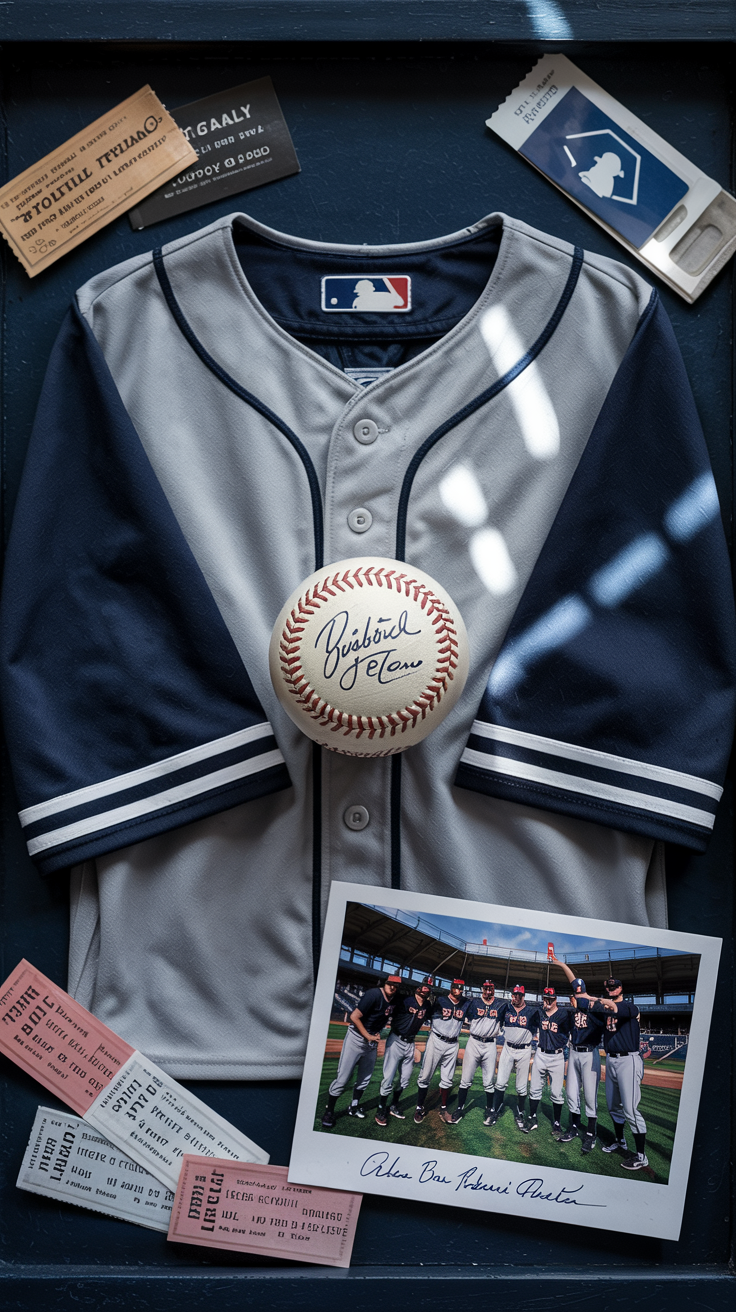
Game-worn jerseys are the most popular centerpiece, but you can also feature signed baseballs, ticket stubs from championship games, trading cards, team photos, and championship rings or medals.
I've seen incredible displays that combine a jersey with the actual ball from a perfect game or a game-winning shot.
The trick with sports memorabilia is embracing your team's colors. Use felt or fabric backing in team colors to make everything pop.
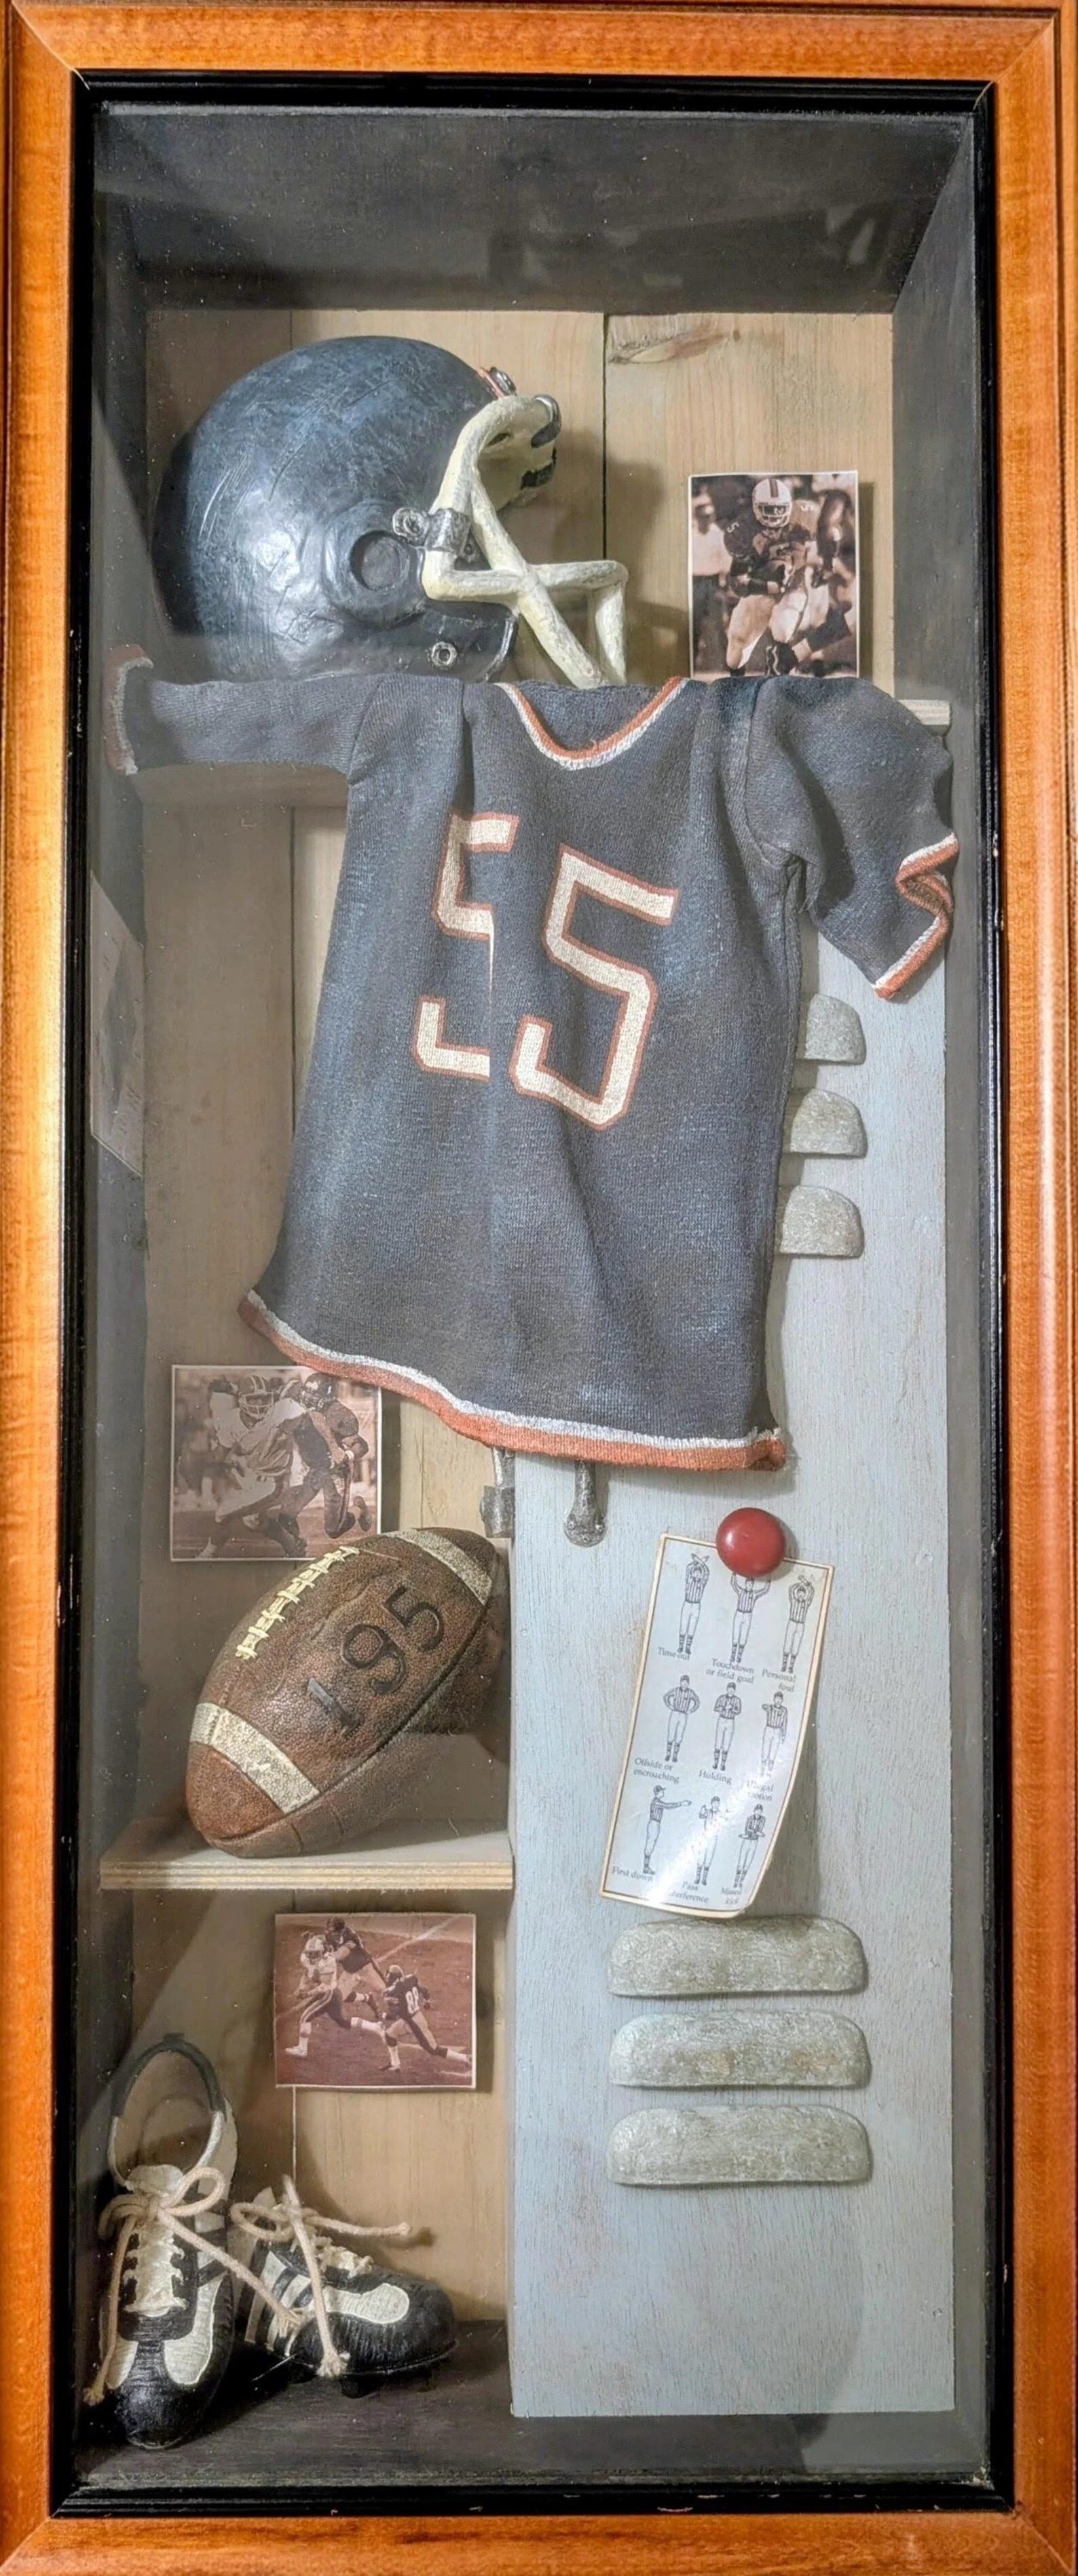
If you're displaying a jersey, make sure your shadow box is deep enough and consider using a mannequin form or creative folding to show off the numbers and logos.
Adding a small plaque with game stats or the date of a special achievement gives context that makes the display even more meaningful.
4. Baby Memory Shadow Boxes
There's something incredibly sweet about preserving those tiny first moments. Baby shadow boxes capture items from your child's earliest days, the stuff that seems too precious to pack away but too small to display on its own.
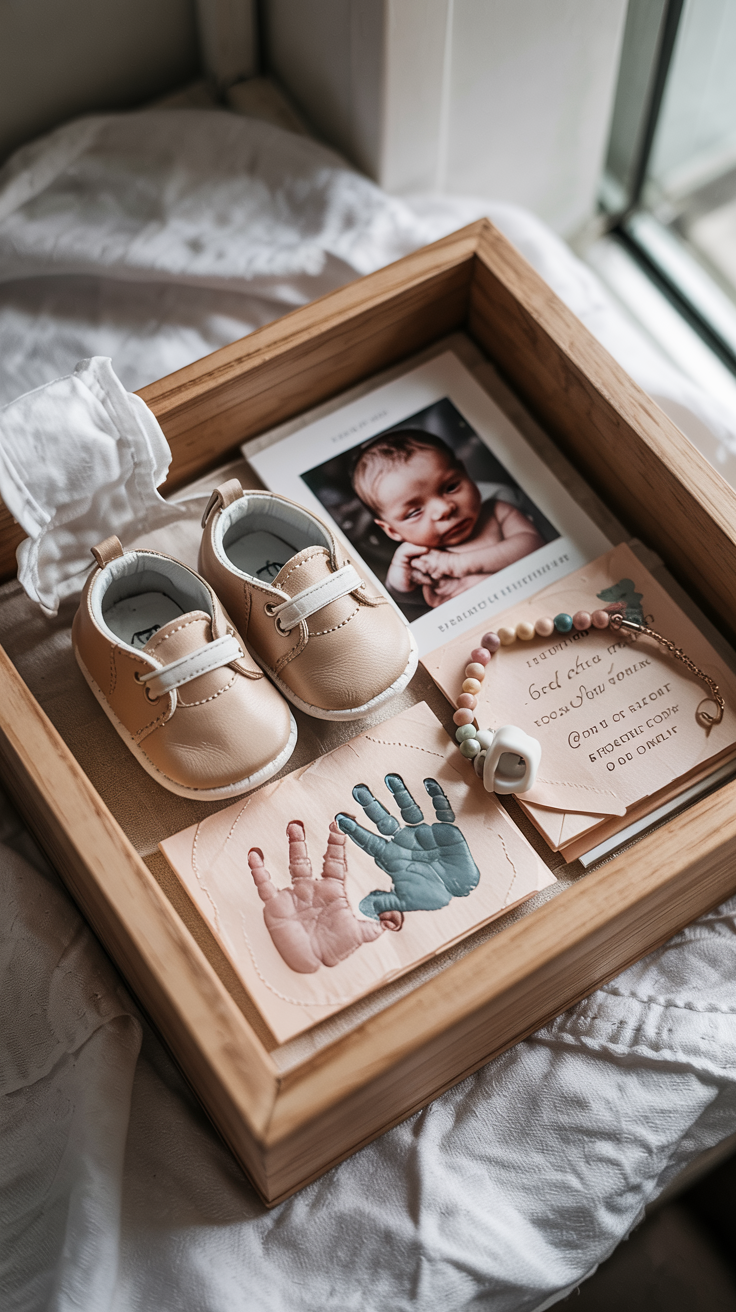
Popular items include the hospital bracelet, first outfit or onesie, a copy of the birth announcement, the first pair of shoes, handprints and footprints, and a lock of hair from that first haircut.
Some parents also add ultrasound photos or a photo from the hospital.
I always recommend using soft, nursery-friendly colors for baby shadow boxes. Pastels work beautifully, but don't be afraid to go bold if that matches your nursery decor.
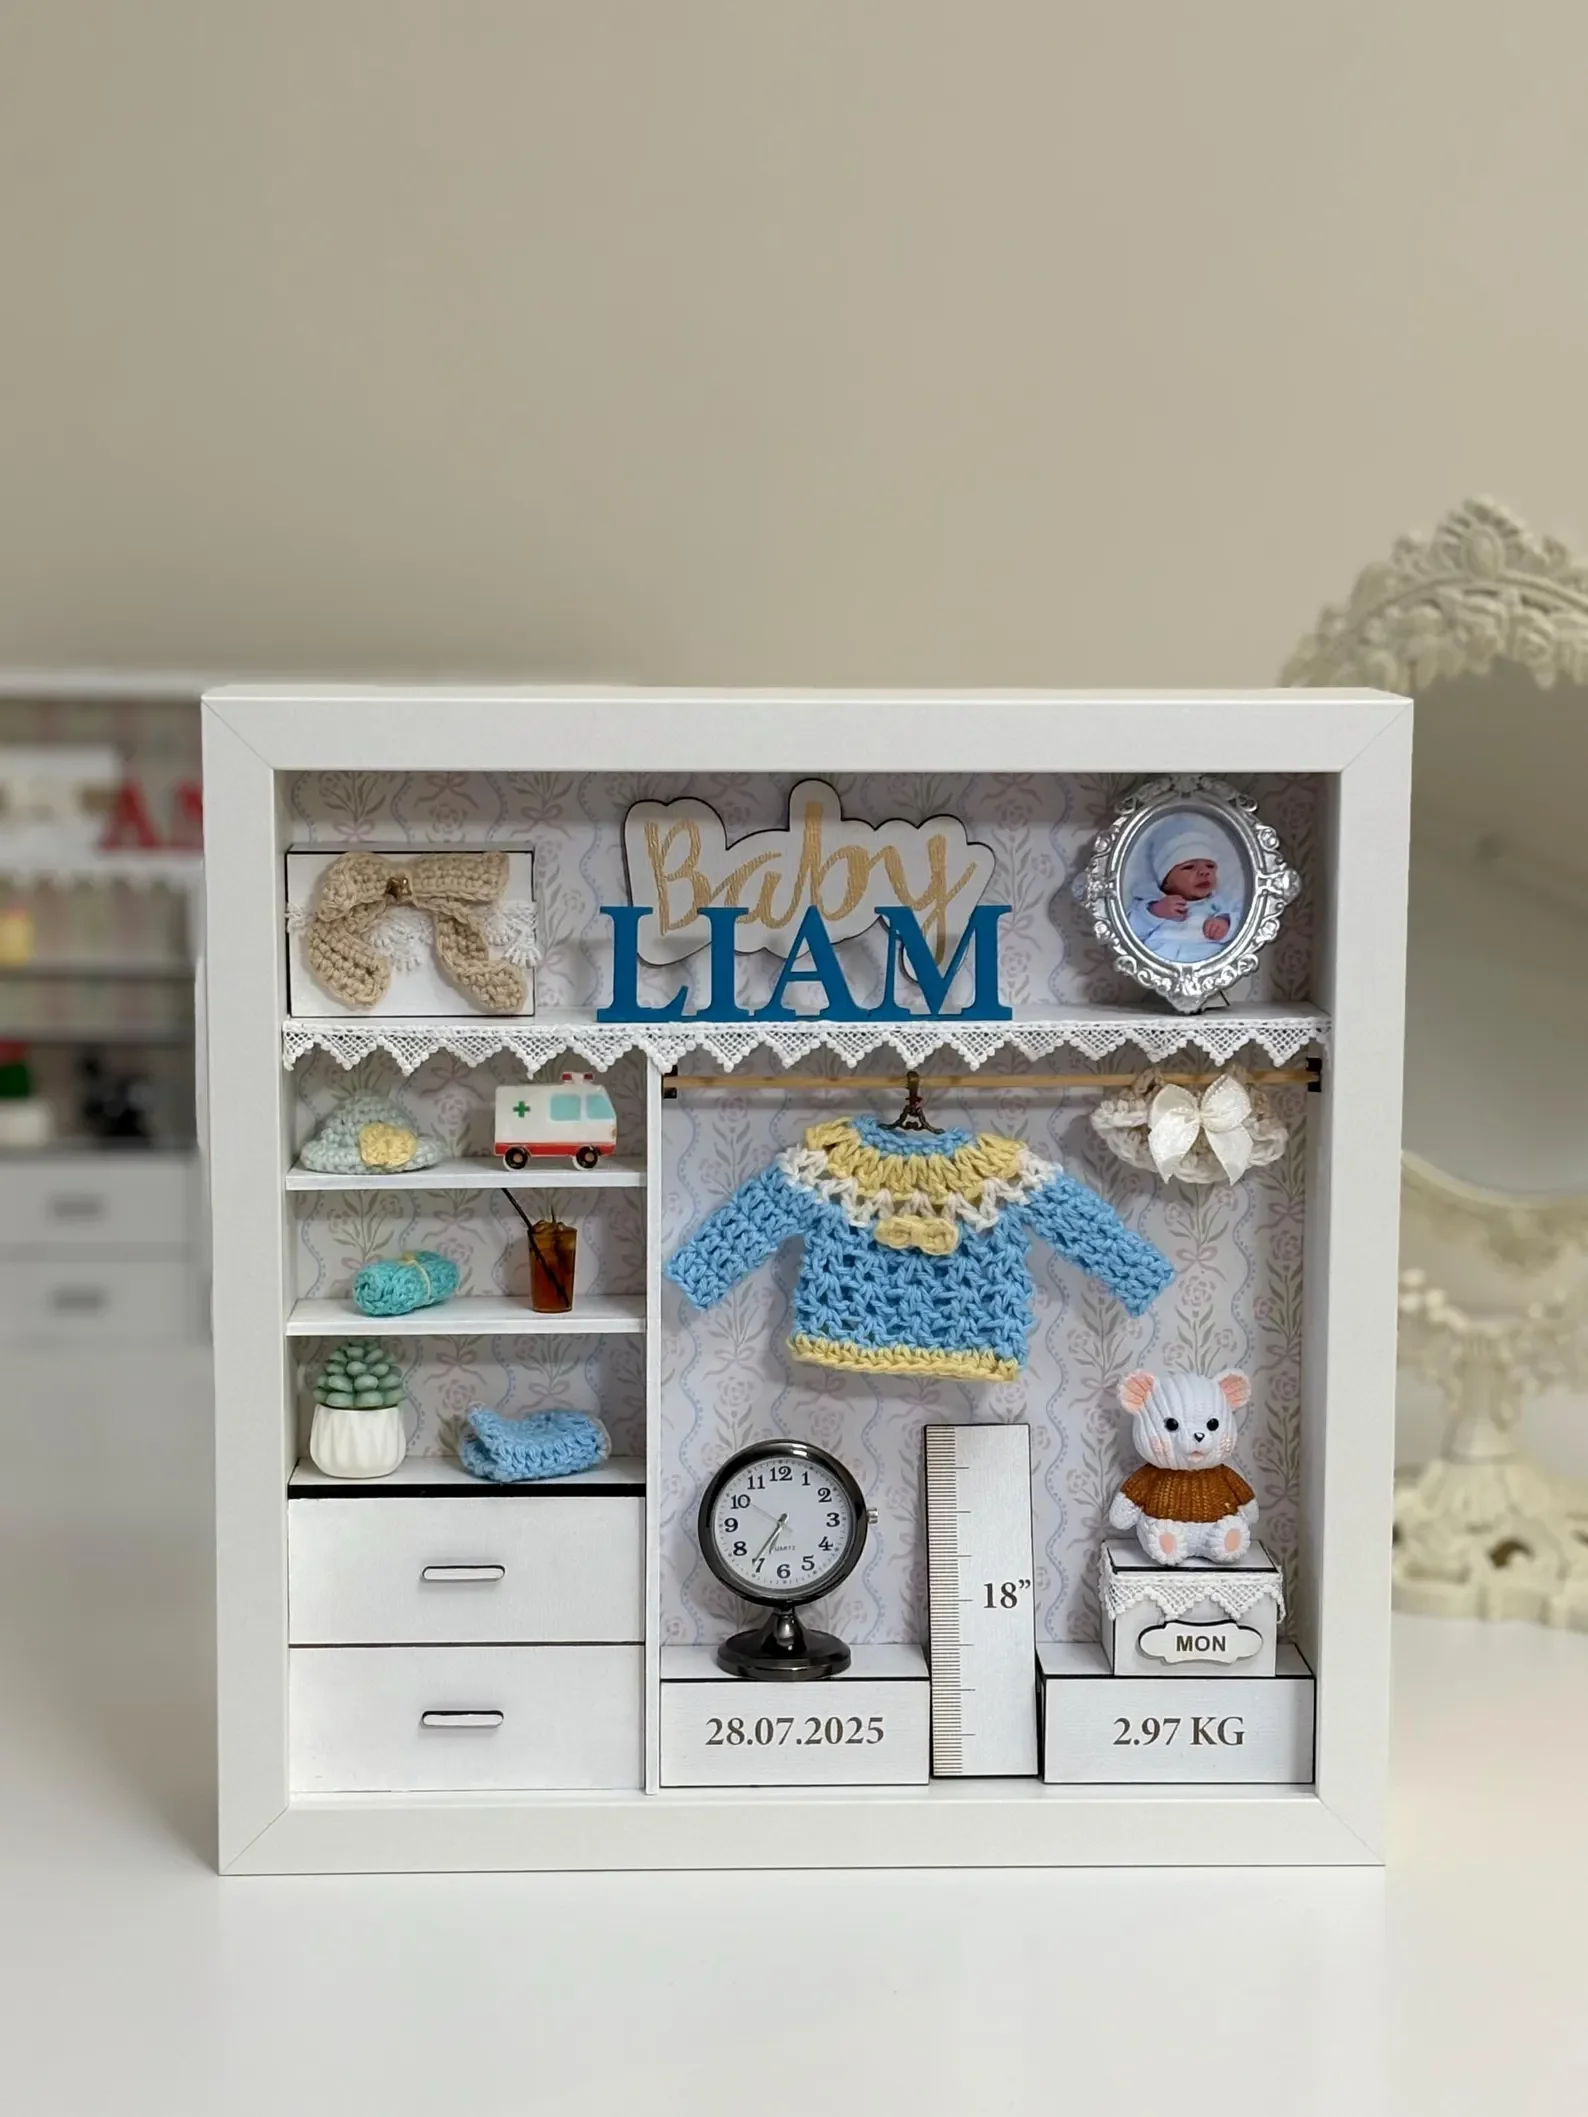
Arrange items chronologically to tell the story of those first days and weeks. These shadow boxes often end up being the most treasured items in a child's room, and eventually something they'll keep forever as adults.
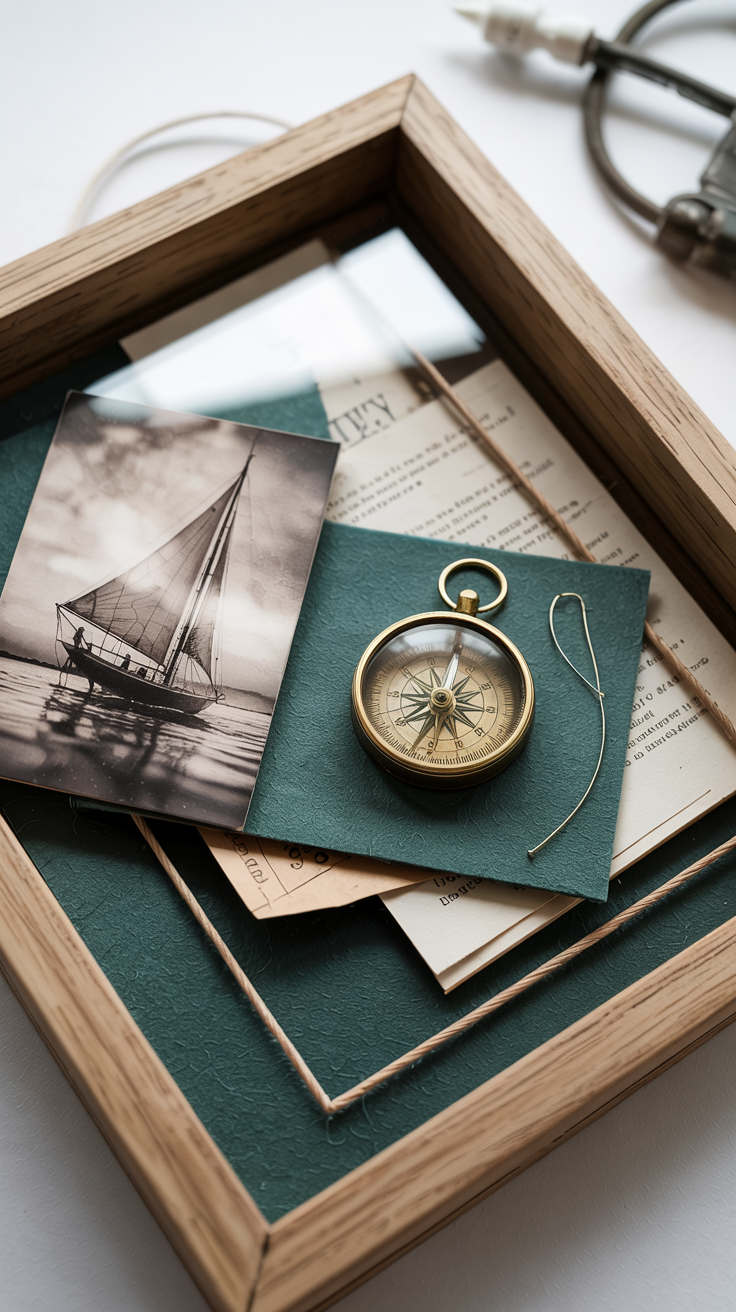
5. Travel Memory Shadow Boxes
If you're like me and can't throw away a single ticket stub or postcard from your travels, shadow boxes are the perfect solution.
They turn all those random souvenirs into a curated display that brings back memories every time you look at it.
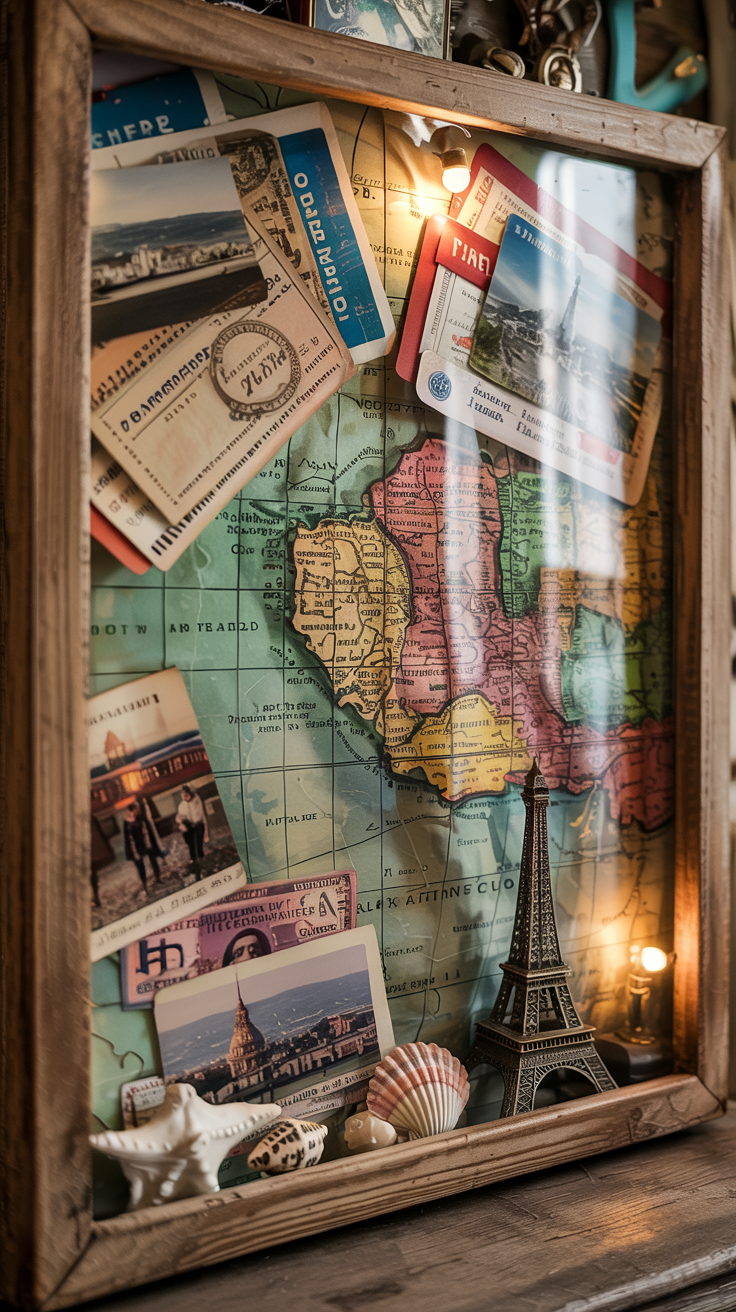
The best travel shadow boxes include boarding passes, train or museum tickets, postcards, maps with your route marked, foreign currency, small souvenirs like keychains or pins, and photos from the trip.
I've even seen people include sand from beaches or pressed flowers from gardens they visited.
Theme your shadow box around a single trip or create one that represents a region you've explored over time.
Use a map as your backing to give geographic context, or choose colors that remind you of the destination. The goal is to create something that instantly transports you back to those experiences.
Don't worry about making it look perfect. Part of the charm of travel shadow boxes is their eclectic, collected-over-time feel.
6. Concert and Music Festival Shadow Boxes
Music lovers know that concerts and festivals create memories that last forever. Shadow boxes let you relive those incredible shows every time you walk past them on your wall.
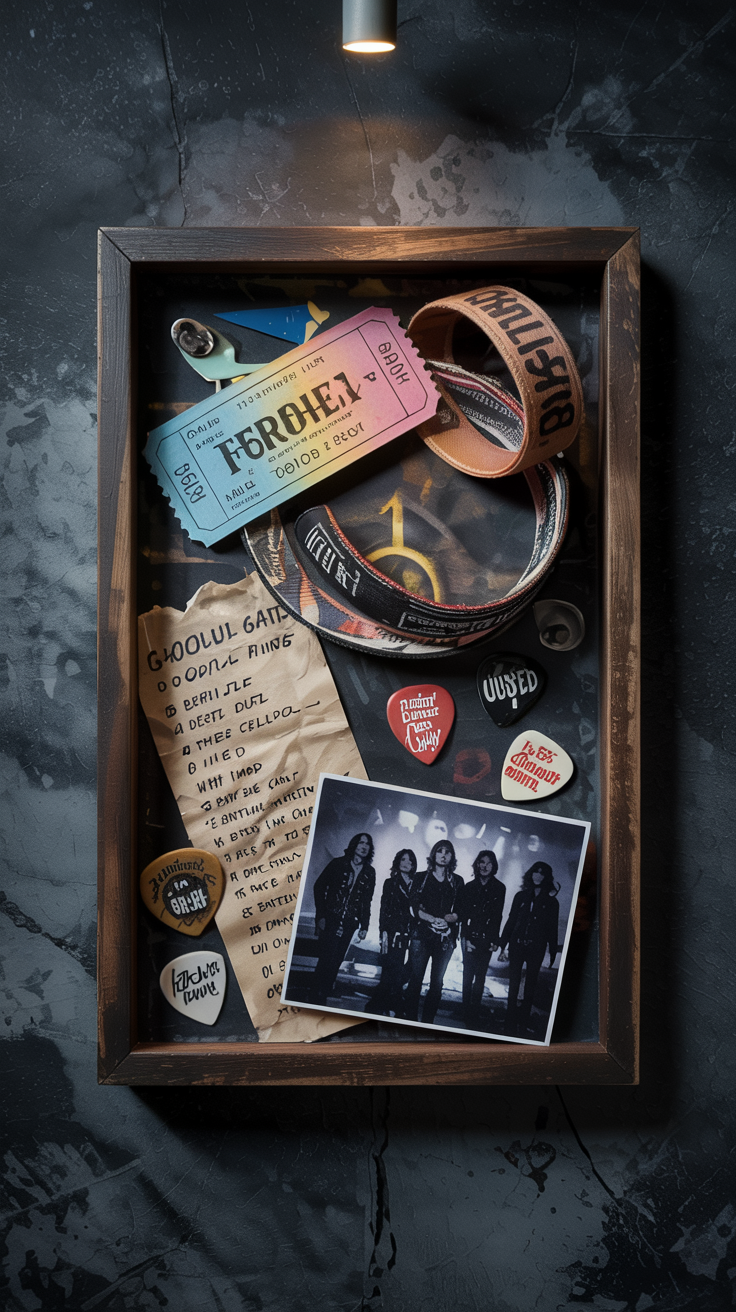
Ticket stubs are the obvious starting point, but also consider including wristbands, backstage passes, set-lists if you were lucky enough to snag one, photos from the show, band t-shirts or patches, guitar picks, and posters or promotional materials.
If you got something signed, that becomes the star of your display.
I love using dark backgrounds for concert shadow boxes. Black felt makes everything pop, especially if you add some mood lighting.
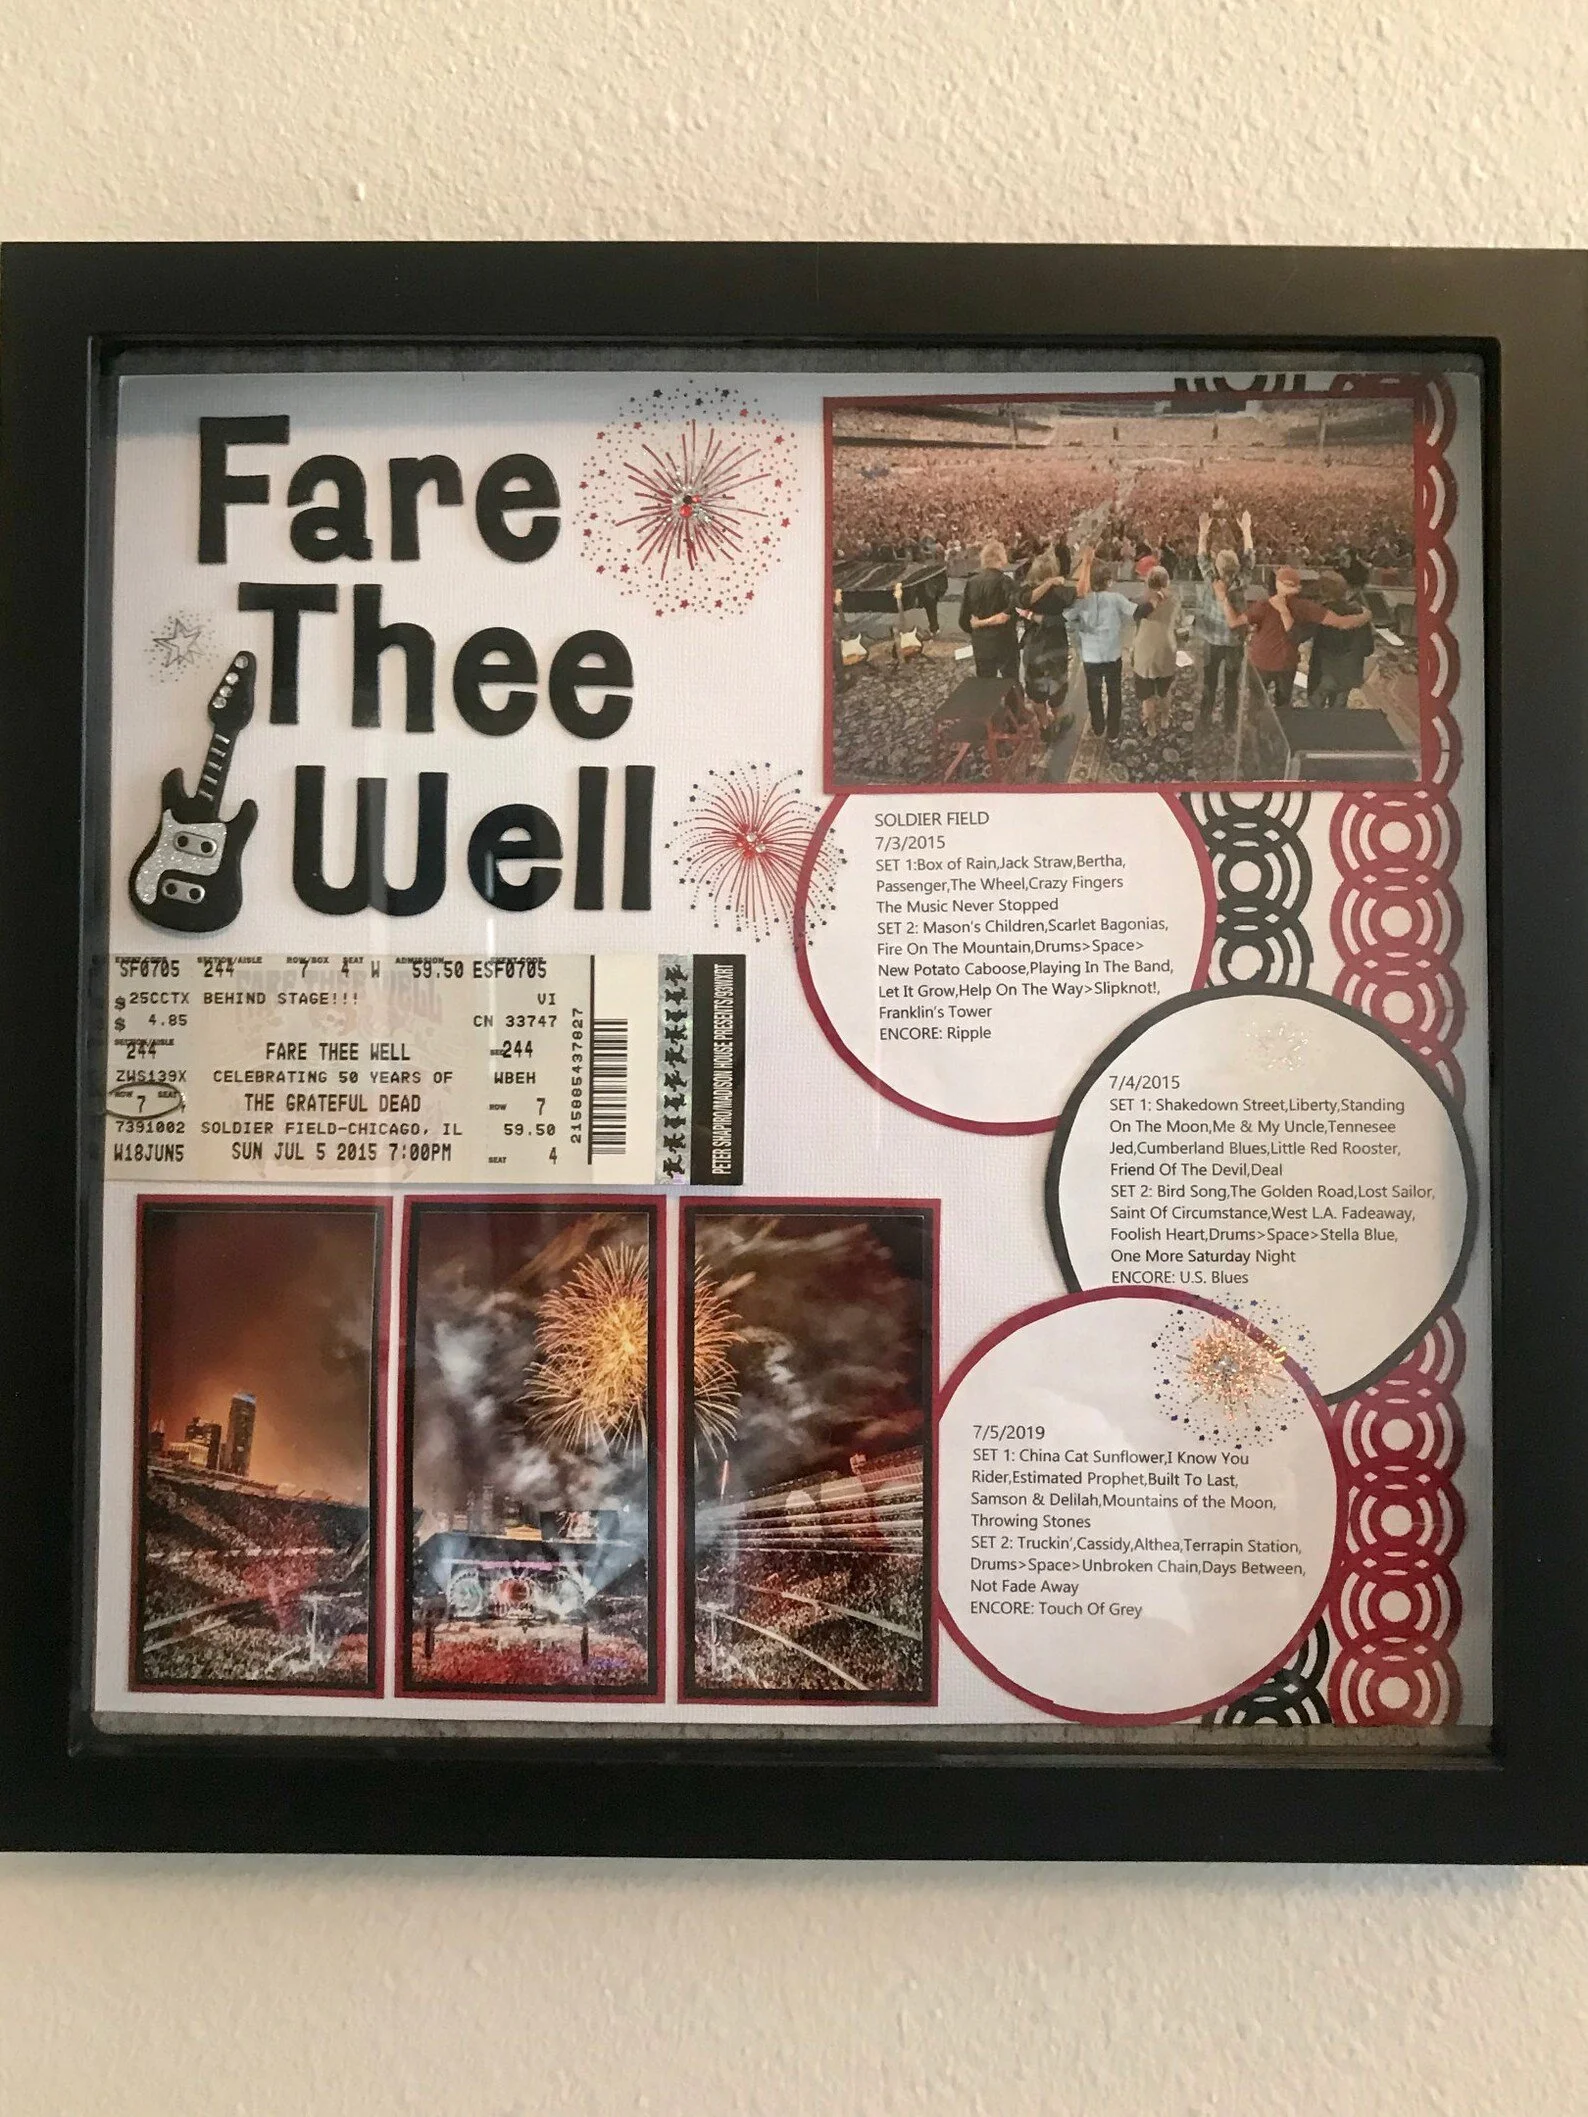
Arrange items chronologically if you're featuring multiple shows, or create a collage-style layout that captures the energy of live music.
These displays work great in music rooms, home bars, or anywhere you want to showcase your personality.
7. Graduation Shadow Boxes
Graduation represents years of hard work, late nights, and major achievements. A shadow box is the perfect way to celebrate this milestone and keep all those accomplishments together in one place.
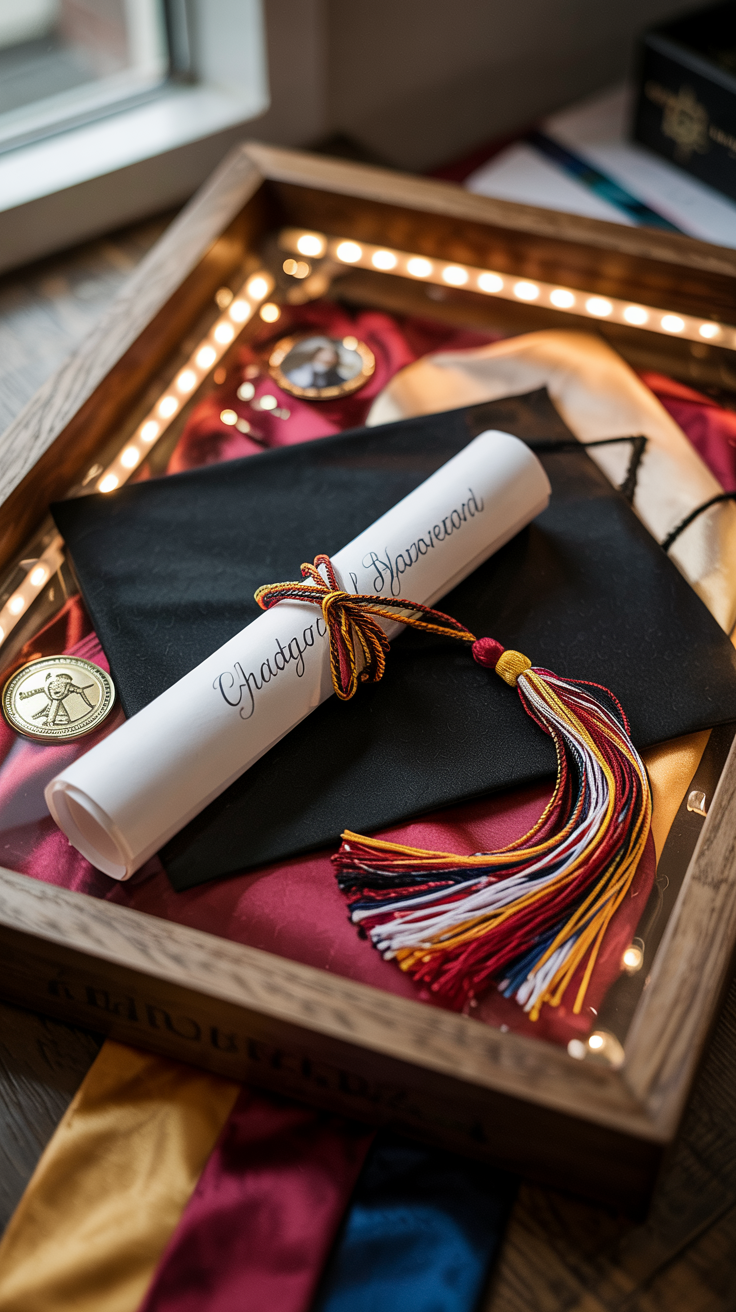
Your diploma takes center stage, but don't stop there. Add your tassel, graduation cap, cords and stoles, academic medals or awards, a photo in your cap and gown, your class ring, and even your thesis title page if you're really proud of it.
Some people include acceptance letters or scholarship certificates too.
Use your school colors for the backing to create instant recognition and pride. Position your diploma at an angle or use a stand to give it prominence.
If you earned multiple degrees, you might need a larger shadow box or create separate displays for each achievement.
Graduation shadow boxes make fantastic gifts for students too, especially if you help them assemble it with items they might not think to save.
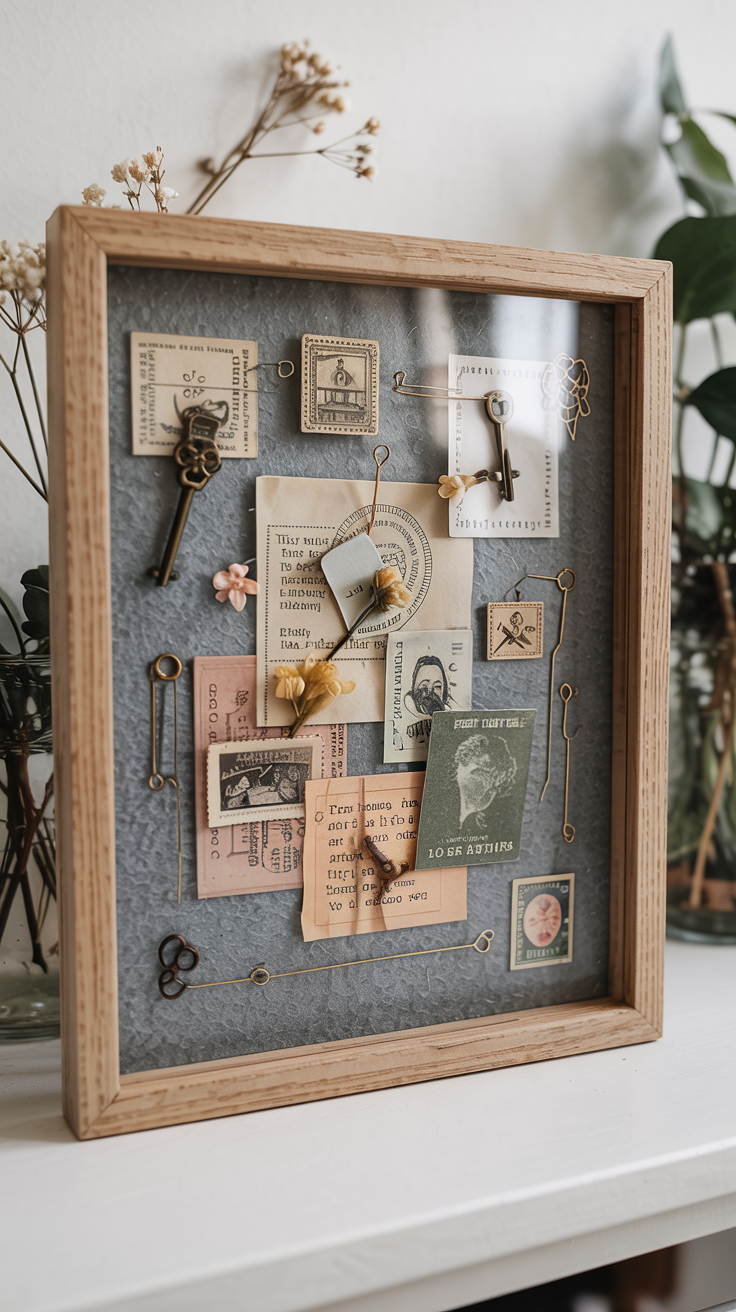
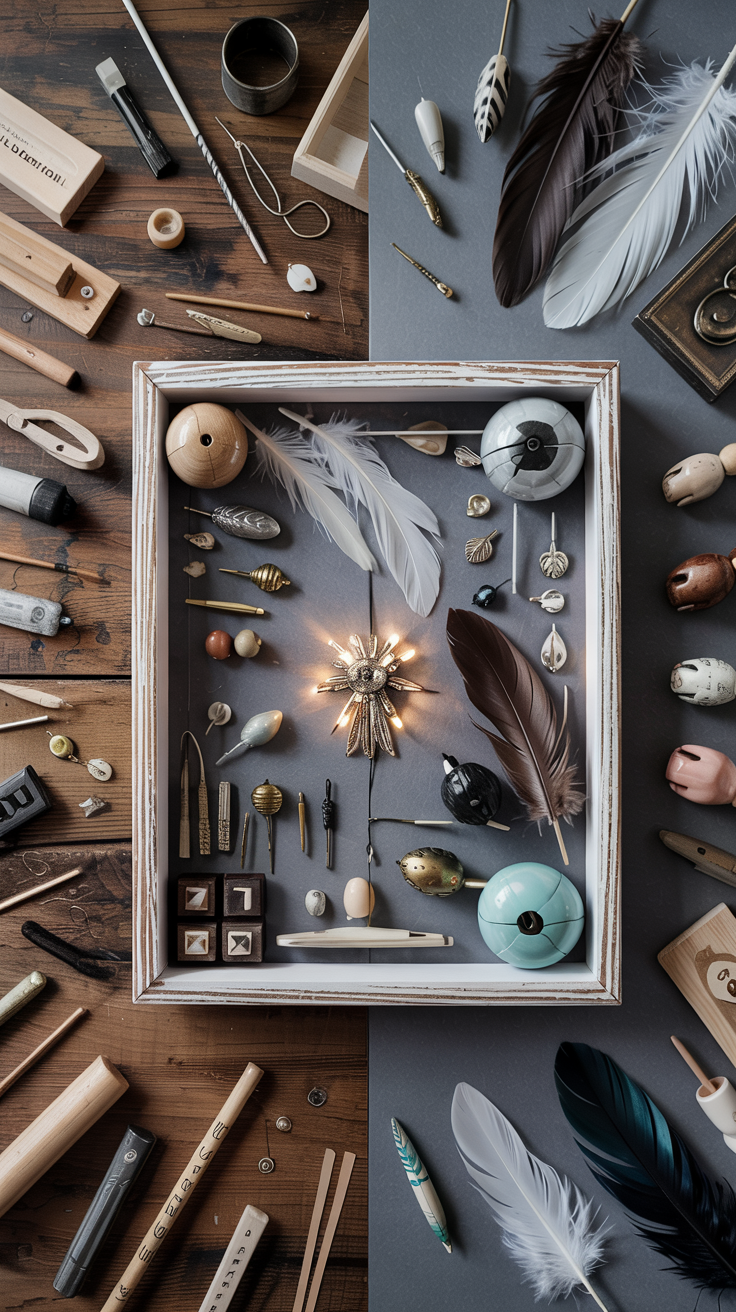
8. Hobby and Collection Shadow Boxes
Collectors, this is where you get to show off. Whether you've been collecting for years or just started a new hobby, shadow boxes give your collection the showcase it deserves.
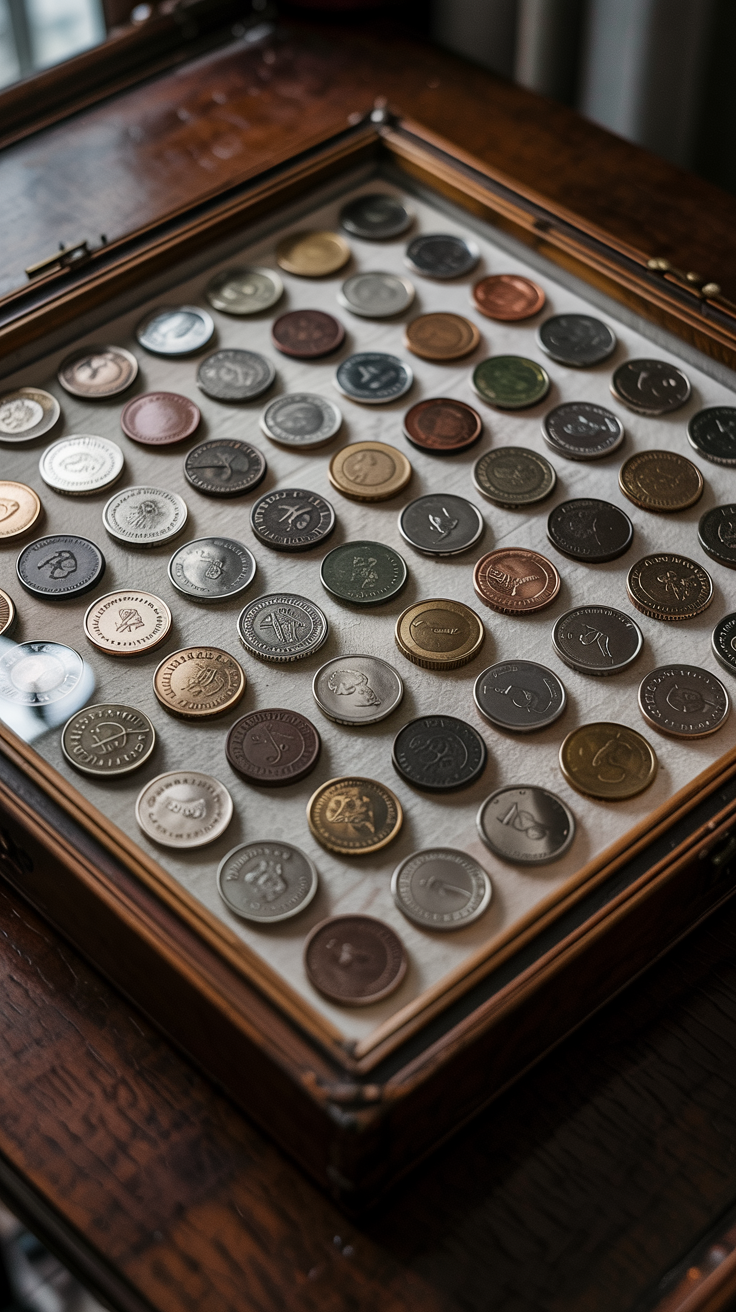
The possibilities here are endless. Coin collectors can create stunning displays organized by year, country, or type. Stamp collectors can arrange rare finds in protective sleeves. Pin and patch collectors can create colorful walls of their favorites. I've seen beautiful shadow boxes featuring seashells arranged by size and type, vintage watches, antique keys, and even organized collections of rocks and minerals.
The key is organization. Group similar items together, create visual patterns, or arrange by color for maximum impact. Use small dividers or compartments to keep everything in place. Label your most prized pieces with small tags that include information about where or when you acquired them. These shadow boxes often become conversation starters and help other people appreciate the passion behind your collection.
9. Family Heritage Shadow Boxes
Family heritage shadow boxes preserve history for future generations. They're about honoring where you came from and keeping those stories alive.
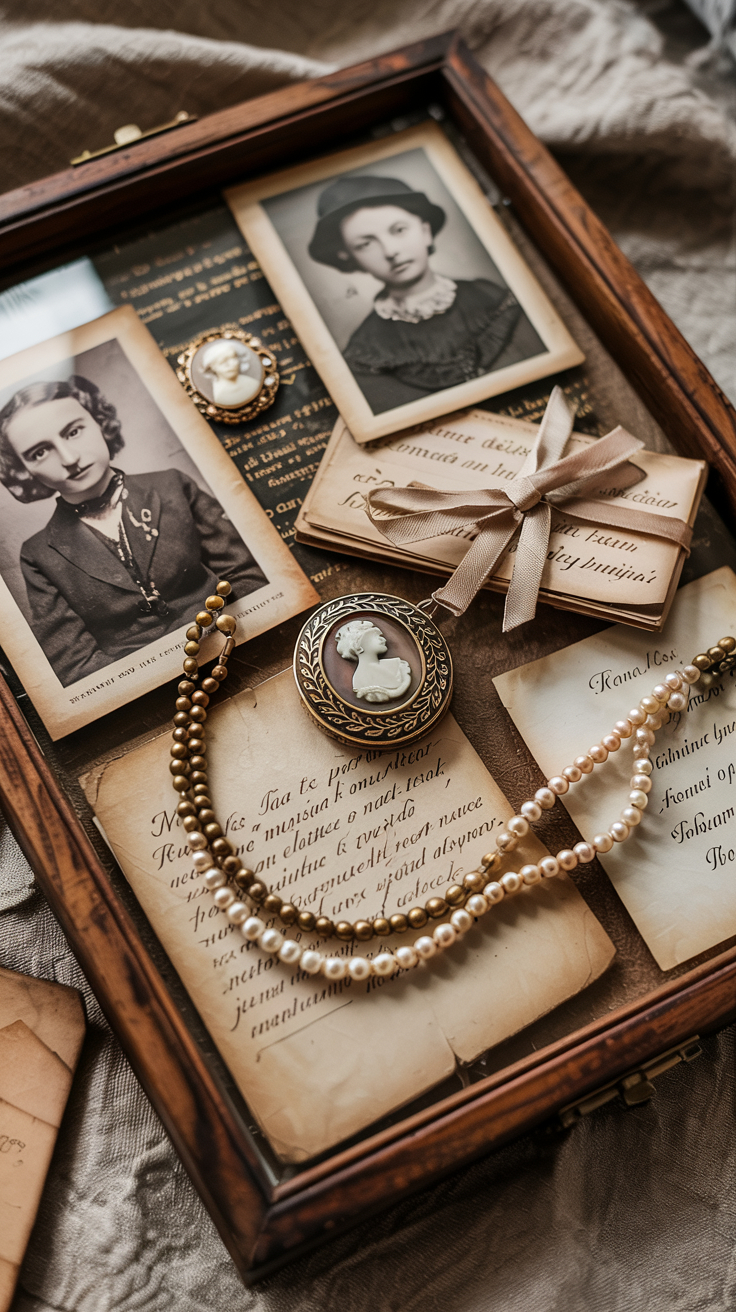
Think vintage family photos, especially ones showing multiple generations together. Add immigration documents, old letters or postcards, family recipes written in grandma's handwriting, heirlooms like jewelry or pocket watches, military service records, and copies of important documents like marriage certificates or birth records. Even small items like buttons, old keys, or pieces of fabric from meaningful clothing can tell a story.
I recommend using a neutral or vintage-inspired backing for heritage displays. Arrange items so they create a timeline or tell a coherent story about your family's journey. Include small handwritten or printed labels that explain who people are and why items are significant. These shadow boxes become family treasures that get passed down, helping younger generations understand their roots.
10. Achievement and Award Shadow Boxes
Last but definitely not least, achievement shadow boxes celebrate your wins, big and small. Whether it's professional accomplishments, athletic victories, or personal milestones, these displays remind you of what you're capable of.
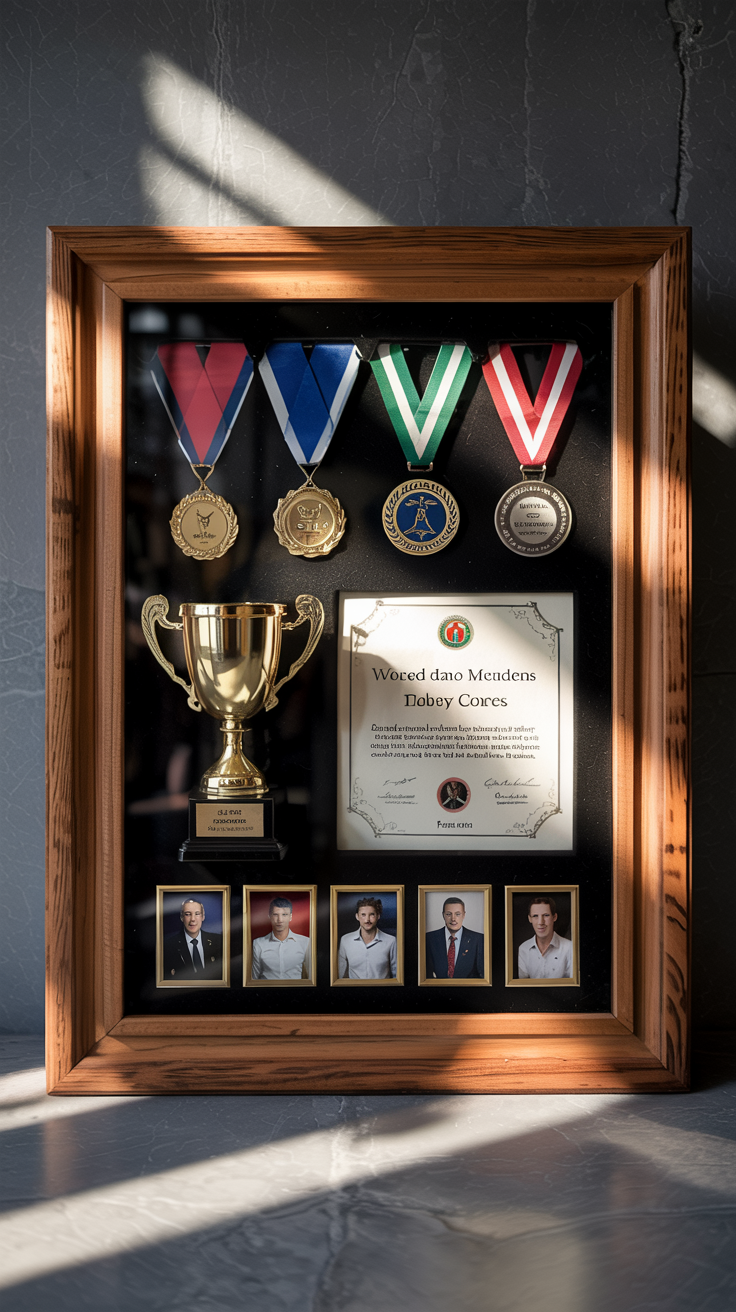
Fill yours with trophies and medals, certificates and diplomas, ribbons from competitions, professional licenses or certifications, published articles or book covers, patent certificates, or photos from award ceremonies. You can create a career achievement shadow box that spans decades or focus on a single incredible accomplishment.
The layout depends on what you're showcasing. If you have one major award, make it the focal point with supporting items around it. If you're displaying multiple achievements, create balance by varying sizes and using symmetry. I like adding small plaques that explain the significance of each award, especially for professional achievements that might not be obvious to visitors. These shadow boxes work great in home offices or anywhere you need a reminder of your capabilities.
Shadow Box Design Tips and Arrangement Ideas
Now that you know what type of shadow box you want to create, let me share some design principles that'll take your display from good to great.
Start with color coordination. Your backing color should complement your items, not compete with them. If you're displaying colorful objects, a neutral background lets them shine. If your items are mostly neutral, a pop of color can make everything more dynamic. I always lay out my items on different colored papers before committing to see what looks best.
Layering and depth are your secret weapons. Don't just lay everything flat against the backing. Use foam mounting squares, small risers, or even folded cardboard to create different levels. This adds dimension and makes your shadow box more interesting from every angle. Items in the foreground should be your focal points, with supporting pieces layered behind.
Balance doesn't mean symmetry. Your eye should move naturally around the display without getting stuck in one spot. I use the rule of thirds from photography. Imagine your shadow box divided into a grid of nine sections, and place important items where those lines intersect. This creates visual interest without looking too studied or formal.
Think about the story you're telling. Arrange items chronologically if that makes sense, or group related pieces together. Sometimes a scattered, organic layout works better than a rigid grid. Step back frequently while you're arranging to see how it reads from a distance.
Labels and context can elevate your display. Small printed cards or handwritten tags add information without cluttering the visual. Include dates, locations, or short descriptions that help viewers understand why these items matter. You can tuck labels under items or mount them directly on the backing.
Shadow Box Materials and Mounting Tips
Let's talk about the nuts and bolts of actually creating your shadow box. These practical details make the difference between a display that lasts decades and one that falls apart.
Choosing the right size and depth starts with your largest item. Measure everything you want to include and add at least an inch of clearance on all sides. Depth is crucial. A 1-inch deep box works for flat items like tickets and photos. Go 2-3 inches deep for baby shoes, medals, or baseballs. Really bulky items like jerseys might need 4 inches or more. When in doubt, go deeper. You can always add more backing material, but you can't make a shallow box deeper.
Mounting techniques vary based on what you're displaying. Museum putty is my go-to for lightweight items that might need repositioning. It's removable and doesn't damage objects. Straight pins work great for fabric items and can be hidden easily. Small clear fishing line or thread can suspend lightweight objects for a floating effect. Archival glue is permanent but necessary for items that need serious hold. For heavy objects like trophies, you might need small shelves or hooks mounted to the backing board.
UV protection is critical if you want your display to last. Regular glass allows harmful UV rays to fade photos, fabrics, and paper over time. UV-protective glass or acrylic costs more upfront but preserves your items for years. It's especially important for irreplaceable items like vintage photos or signed memorabilia. If you can't afford UV glass for everything, prioritize it for your most valuable shadow boxes.
You have two main options for acquiring your shadow box. Buying pre-made boxes from craft stores or online gives you standard sizes and professional quality. Brands like Michaels, Hobby Lobby, and online retailers offer dozens of options at various price points. Custom framing shops can build exactly what you need but cost significantly more. DIY is totally doable if you're handy. You can buy shadow box kits or build your own frame using wood, glass, and backing board. I've done both, and honestly, unless you need a very specific size, buying pre-made usually saves time and frustration.
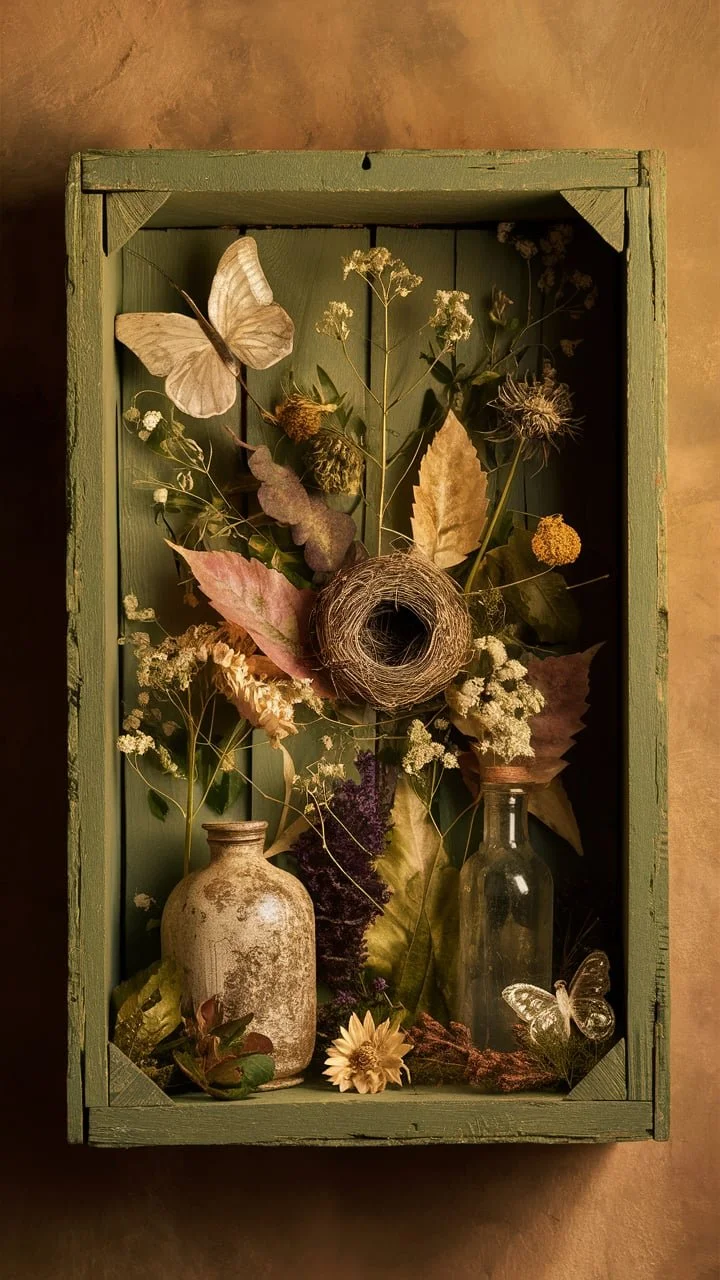
DIY Vintage Shadow Box Project
Materials You’ll Need
Old Wooden Crate: Look for one at flea markets, thrift stores, or even in your garage. The size is up to you, but a medium-sized crate (12x12 inches or so) works well.
Distressed White Paint: Chalk paint or matte paint works best for a vintage look.
Sandpaper: Medium and fine grit for distressing.
Small Flea Market Finds: Miniature clocks, antique photos, vintage keys, small frames, trinkets, or anything that speaks to you.
Hot Glue Gun or Strong Adhesive: To secure items inside the crate.
Hanging Hardware: Picture hooks or D-ring hangers for wall mounting.
Optional: Clear varnish or sealant to protect the paint, decorative paper or fabric for the back panel, and small LED lights for added ambiance.
Step-by-Step Instructions
1. Prepare the Wooden Crate
Clean the Crate: Wipe down the crate with a damp cloth to remove dust and dirt. Let it dry completely.
Sand the Surface: Lightly sand the crate to smooth out rough edges and create a surface that the paint can adhere to. Focus on areas where you want the distressed look to show through.
2. Paint the Crate
Apply the Base Coat: Use a brush to apply a coat of distressed white paint. Don’t worry about making it perfect—the goal is to achieve a worn, vintage look. Let the paint dry completely.
Sand for Distressing: Once the paint is dry, use medium-grit sandpaper to gently sand edges, corners, and raised areas. This will reveal the natural wood underneath, giving the crate a timeworn appearance. Switch to fine-grit sandpaper for a smoother finish.
Optional Sealant: If you want to protect the paint, apply a clear varnish or sealant. Let it dry completely.
3. Arrange Your Flea Market Finds
Plan Your Layout: Before gluing anything down, arrange your items inside the crate. Play around with different compositions until you find one that tells a story or feels visually balanced. Consider layering items—for example, place a small frame in the back and a vintage key in the front.
Secure the Items: Once you’re happy with the arrangement, use a hot glue gun or strong adhesive to secure each item in place. Be careful not to overdo the glue—just a small dab will do.
4. Add Finishing Touches
Back Panel (Optional): If you want to add a decorative touch, cut a piece of patterned paper or fabric to fit the back of the crate. Secure it with glue or small nails.
Lighting (Optional): For a dramatic effect, attach small LED lights inside the crate to highlight your display. Battery-operated lights are easy to install and won’t require any wiring.
5. Hang Your Shadow Box
Attach Hanging Hardware: Secure picture hooks or D-ring hangers to the back of the crate. Make sure they’re evenly spaced and sturdy enough to support the weight of the crate and its contents.
Find the Perfect Spot: Choose a wall that complements your decor and allows the shadow box to stand out. Use a level to ensure it hangs straight.
Create Your Perfect Shadow Box Display
Creating a shadow box is about more than just displaying objects. It's about preserving memories, honoring achievements, and telling stories that matter to you and your family.
Whether you're memorializing military service, celebrating a wedding, or showcasing your travels around the world, shadow boxes turn meaningful moments into lasting art. The beauty is that there's no right or wrong way to do it. Your shadow box should reflect your personal style and the unique story behind your keepsakes.
I encourage you to start with one project that speaks to you. Gather your items, choose your backing, and experiment with layouts until something clicks. Don't stress about making it perfect. The imperfections and personal touches are what make your shadow box uniquely yours.
What type of shadow box are you thinking about creating? I'd love to hear about your projects and see what you come up with. Drop a comment below and share your shadow box ideas or photos of displays you've already created. Let's inspire each other to preserve the memories that make life special.
The Best Vintage Cottage Decor Ideas for Your Cozy Home
Frequently Asked Questions About Shadow Boxes (FAQs)
What is the difference between a shadow box and a regular picture frame?
The main difference is depth. Regular picture frames are designed to hold flat items like photos and prints, usually with just a few millimeters of space between the glass and backing. Shadow boxes are much deeper, typically ranging from 1 to 4 inches, which allows you to display three-dimensional objects like medals, baby shoes, or sports memorabilia. Think of a shadow box as a display case mounted on your wall.
How deep should a shadow box be?
It depends on what you're displaying. For flat items like tickets, photos, and paper memorabilia, a 1-inch depth works fine. Most standard keepsakes like medals, jewelry, or small toys need 2-3 inches. Bulky items like baseballs, folded jerseys, or baby shoes require 3-4 inches or more. I always recommend measuring your thickest item and adding at least an inch of clearance to be safe.
How do you attach items inside a shadow box?
There are several methods depending on your items. Museum putty works great for lightweight objects and is removable. Straight pins are perfect for fabric items and can be hidden behind your objects. Clear fishing line can suspend lightweight items for a floating effect. Hot glue or archival glue provides permanent hold for heavier pieces. For very heavy items like trophies, you might need small shelves or hooks secured to the backing board.
Can you put fabric in a shadow box?
Absolutely. Fabric items like wedding dress pieces, baby clothes, quilts, or uniforms are perfect for shadow boxes. You can fold them to show important details, drape them for visual interest, or stretch them flat. Use pins to secure fabric to the backing, making sure the pins are hidden behind folds or other items. For delicate or vintage fabrics, consider using acid-free tissue paper as a barrier between the fabric and backing.
Do shadow boxes need glass?
Yes, I strongly recommend using glass or acrylic. It protects your items from dust, moisture, and accidental damage. More importantly, it keeps everything secure inside the frame. For valuable or irreplaceable items, invest in UV-protective glass or acrylic to prevent fading from sunlight. Regular glass is fine for everyday displays, but UV protection is worth it for heirlooms, signed memorabilia, or vintage photos.
How do you keep items from falling in a shadow box?
Proper mounting is key. Use appropriate adhesives or fasteners for each item's weight and material. Museum putty works for lightweight objects, while heavier items need glue, pins, or mechanical fasteners. Make sure your shadow box hangs securely on the wall and isn't in a high-traffic area where it might get bumped. If you're displaying very heavy items, consider mounting them to a wooden backing board that's screwed into the frame, not just glued to poster board.
What backing should I use for a shadow box?
Popular backing options include felt, fabric, specialty scrapbook paper, or foam board covered in your chosen material. Felt is my favorite because it comes in tons of colors, has a nice texture, and makes pinning items easy. Fabric like burlap, silk, or velvet adds elegance. Cork board works well if you need to pin multiple items. Whatever you choose, make sure it's acid-free if you're preserving valuable or irreplaceable items.
How much does a custom shadow box cost?
Pre-made shadow boxes from craft stores typically run $20 to $100 depending on size and quality. Custom shadow boxes from professional framers can cost anywhere from $100 to $500 or more, especially for large sizes or specialty features like museum-quality materials and UV glass. DIY shadow boxes are the most budget-friendly if you're willing to put in the work. You can build basic ones for $30 to $50 in materials.
Can shadow boxes hold heavy items?
Yes, but you need to plan accordingly. The backing board needs to be sturdy enough to support the weight. Use thick foam board, wood, or even plywood for heavy items. Secure items with strong adhesives, screws, or wire rather than just glue. Make sure the shadow box itself is well-constructed with reinforced corners. When hanging, use appropriate wall anchors rated for the total weight of the frame plus contents.
Where should I hang my shadow box?
Hang shadow boxes at eye level in areas where they'll be appreciated but not damaged. Living rooms, hallways, offices, and bedrooms are popular choices. Avoid direct sunlight, which fades items over time, and humid areas like bathrooms that can damage paper and fabric. If your shadow box contains irreplaceable items, keep it away from fireplaces, kitchens, or anywhere else it might be exposed to heat, smoke, or moisture.
How do I clean a shadow box?
Dust the glass regularly with a soft, dry microfiber cloth. For stubborn spots, use glass cleaner on the cloth, never directly on the glass, to avoid any liquid seeping into the frame. Dust the frame edges with a dry cloth or soft brush. Don't open the shadow box frequently, as this exposes items to dust and handling. If items inside need cleaning, remove them carefully, clean according to their material, and remount them properly.
Can I change items in my shadow box later?
Definitely, as long as you used removable mounting methods. Museum putty peels off easily. Pins can be removed without damage. Even some adhesives are repositionable. If you think you might want to swap items later, avoid permanent glues and screws. This is especially useful for achievement shadow boxes where you're adding new awards over time, or seasonal displays that you update periodically.