Small Beach House Kitchen Ideas: 5 Designer-Approved Styles + DIY Projects (2026)
This post may contain affiliate links. If you make a purchase through one of my links, I may receive a small commission at no cost to you.
Are you looking to transform your small beach house kitchen into a stunning coastal retreat? I've been there! Whether you live by the ocean full-time or escape to your beach cottage on weekends, creating a beautiful and functional small beach kitchen is totally achievable.
Here are my favorite small beach house kitchen ideas that will help you maximize every inch of space while capturing that breezy coastal vibe you love. From nautical color palettes to clever storage solutions, these beach cottage kitchen decorating tips work for any budget. I'll walk you through five distinct coastal kitchen styles, complete with DIY projects you can tackle this weekend and practical styling advice that actually works in real life.
The best part? You don't need a massive kitchen or unlimited funds to create a space that feels like a permanent vacation. Small coastal kitchens have so much charm, and with the right approach, your beach house kitchen can be both gorgeous and incredibly practical.
Key Takeaways
Five unique coastal kitchen styles ranging from minimalist to eclectic, so you can find the perfect look for your beach house
Budget-friendly DIY projects including driftwood shelves, painted furniture, and custom tile backsplashes you can create yourself
Smart styling tips for maximizing storage and keeping small beach kitchens feeling open and airy
Specific color palettes for each style, from nautical neutrals to bright tropical hues
Practical decorating advice that balances beautiful coastal aesthetics with real-world functionality
Ready to dive in? Grab your coffee (or that iced latte, because beach vibes!) and let's transform your small beach house kitchen together.
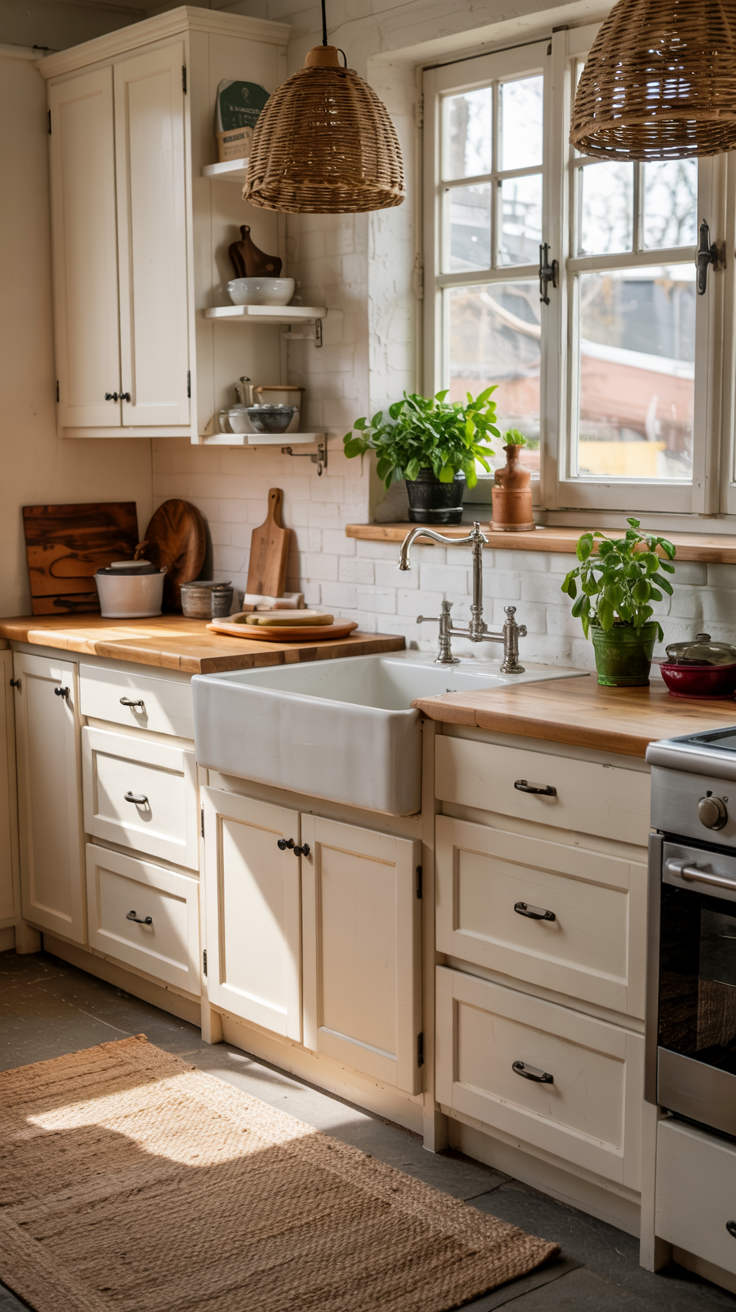
1. Nautical Neutral Beach Kitchen: White Cabinets and Navy Blue Accents
Picture this: soft white cabinets, weathered wood accents, and just a hint of navy blue. This nautical neutral style is my absolute favorite for small beach house kitchens because it keeps things light and airy while adding those classic coastal touches that never go out of style.
The beauty of this look is how it maximizes the feeling of space in small beach kitchens. White reflects light and makes your kitchen feel significantly larger, while the navy blue adds just enough contrast to create visual interest without overwhelming the room. I have seen this style work beautifully in beach cottages from the Outer Banks to Cape Cod, and it truly is timeless.
Nautical Neutral Color Palette
Getting your color palette right is crucial for this coastal kitchen style. Here are the specific colors I recommend:
Primary Color: Crisp White
Benjamin Moore Simply White (OC-117) for a warm white
Sherwin Williams Pure White (SW 7005) for a cooler, crisper white
Behr Ultra Pure White (PPU18-06) for a budget-friendly option
Accent Color: Navy Blue
Sherwin Williams Naval (SW 6244) for a rich, classic navy
Benjamin Moore Hale Navy (HC-154) for a softer nautical blue
Use on 20 to 30 percent of the space (textiles, one accent wall, or lower cabinets)
Warmth: Natural Wood Tones
Honey oak or light pine for butcher block countertops
Weathered driftwood gray for open shelving
Natural jute or sisal for rugs and baskets
How to Create This Nautical Beach Kitchen Look
Step 1: Start with White Cabinets
If you already have cabinets, painting them white is your most impactful update. I recommend using semi-gloss or satin finish paint specifically designed for cabinets. It resists moisture better in coastal climates and wipes clean easily. For new cabinets, white shaker style is the gold standard for beach cottage kitchens. The simple recessed panel design feels classic and coastal without being too trendy.
Step 2: Add Natural Wood Elements
Install open shelving made from reclaimed wood or pine boards. I suggest shelves that are 8 to 10 inches deep and at least 1.5 inches thick for a substantial look. A butcher block countertop brings warmth and texture while being incredibly practical for food prep. If a full butcher block countertop is not in your budget, consider adding a small butcher block section on your island or as a cutting board area.
Step 3: Incorporate Navy Blue Accents
This is where your nautical theme really comes to life. Add navy blue through these strategic touches:
Navy and white striped dish towels (Williams Sonoma has beautiful options, or check Target for budget-friendly versions)
A navy blue kitchen rug (indoor-outdoor rugs work great in beach houses)
Navy pendant lights in a classic dome or lantern style
Navy blue bar stools if you have an island or breakfast bar
A few navy blue canisters or storage containers on open shelves
Step 4: Layer in Coastal Textures
Use woven baskets in natural jute or seagrass for storage on open shelves. These hide clutter while adding that beachy texture. Display white or cream-colored dishes and glassware on open shelving. Add a glass jar filled with sand and shells as a subtle reminder of the beach. Choose simple linen or cotton curtains in white or natural tones to keep windows light and bright.
What to Avoid in Nautical Neutral Kitchens
While creating this look, steer clear of these common mistakes:
Heavy dark wood cabinets or furniture that makes small beach kitchens feel cramped and dated
Too many nautical motifs like anchors, ropes, and ship wheels (one or two subtle touches are enough)
Red accents (this creates a patriotic look rather than coastal)
Busy patterned backsplashes that compete with your design (stick with simple white subway tile or clean white beadboard)
Glossy finishes everywhere (mix in some matte textures for depth)
DIY Project: Driftwood Floating Shelf
This is one of my favorite weekend projects for adding authentic coastal charm to your nautical kitchen. It takes about one hour and costs under $30.
Materials You Need:
One piece of driftwood, 24 to 36 inches long and at least 4 inches wide
120-grit sandpaper
Clear polyurethane sealant (matte or satin finish)
Two floating shelf brackets (rated for the weight you plan to display)
Level
Drill and screws
Stud finder
Step-by-Step Instructions:
First, clean your driftwood piece thoroughly and let it dry completely. You can find driftwood at the beach (check local regulations first), or purchase it from craft stores like Michaels or Hobby Lobby. Sand down any rough spots or splinters with 120-grit sandpaper, but keep the weathered character intact. That worn texture is what makes it special.
Apply two coats of clear polyurethane sealant to protect the wood and make it easier to clean. I prefer matte or satin finish because high gloss looks too polished for driftwood. Let it dry completely between coats (usually 2 to 4 hours).
Install your floating shelf brackets according to the manufacturer instructions. Make absolutely sure you are drilling into wall studs for proper support. Use a level to ensure your brackets are perfectly straight. Slide or attach your driftwood piece onto the brackets, and you have a gorgeous coastal shelf ready to display your favorite coffee mugs, small potted herbs, or beach-themed decor.
Skill Level: Beginner-friendly (no prior woodworking experience needed) Time Required: 1 hour active work, plus drying time Cost: $20 to $30 depending on whether you source your own driftwood
Shopping List for Nautical Neutral Beach Kitchen
Here is everything you need to create this look:
Paint and Finishes:
White cabinet paint in semi-gloss finish (1 gallon covers most small kitchens)
Clear polyurethane sealant for wood protection
Textiles:
3 to 4 navy and white striped dish towels
1 navy blue kitchen rug (2x3 feet or 3x5 feet depending on your space)
White or natural linen curtains if needed
Storage and Organization:
2 to 3 medium-sized woven baskets in natural jute or seagrass
Glass jars or canisters for pantry items (clear glass shows off your ingredients)
White ceramic canisters for countertop storage
Lighting:
1 to 2 navy blue pendant lights in dome or lantern style
Decor Elements:
Small potted herbs (basil, rosemary, or succulents)
1 large glass jar for sand and shell display
White or cream-colored dishes if replacing existing ones
Budget Breakdown for This Nautical Kitchen Style
Budget-Friendly Update ($500 to $1,000):
Paint existing cabinets white yourself
DIY driftwood shelf
Navy textiles and small decor items
Woven baskets from discount stores
One new pendant light
Mid-Range Transformation ($2,000 to $4,000):
Professional cabinet painting or new white shaker cabinets
Butcher block countertop section
Two to three custom open shelves
New lighting package
Quality hardware and fixtures
High-End Renovation ($5,000 to $8,000):
Custom white shaker cabinets
Full butcher block or quartz countertops
Professional open shelving installation
Premium navy pendant lights
New farmhouse sink with brass or bronze fixtures
Additional Styling Tips for Small Nautical Kitchens
Keep your countertops as clear as possible. Small beach house kitchens need every inch of workspace, so only display items you use daily. Store everything else in cabinets or on shelves.
Use the vertical space above your cabinets for decorative baskets or coastal artwork. This draws the eye up and makes ceilings feel higher in compact kitchens.
Install under-cabinet lighting to brighten your workspace and create ambiance in the evenings. LED strip lights are affordable and easy to install yourself.
Choose cabinet hardware in brushed nickel, oil-rubbed bronze, or brass finishes. These metals all work beautifully with the nautical neutral palette and resist corrosion in coastal environments.
Add a small vase of fresh white flowers or greenery on your counter or table. This brings life into the space without adding clutter.
Why This Style Works for Small Beach House Kitchens
The nautical neutral look is practically made for small coastal kitchens. White cabinets and walls reflect natural light, making your space feel twice as large. The minimal color palette (just white, navy, and natural wood) keeps the design from feeling busy or overwhelming in a compact area.
This style also transitions beautifully between seasons. In summer, you can add brighter blue accents and fresh flowers. In fall and winter, swap in warmer textures like chunky knit dish towels and wooden serving pieces. The neutral base stays constant while you change up small details.
I also love that this nautical kitchen style has serious staying power. Unlike trendy designs that feel dated in a few years, the classic combination of white, navy, and natural wood has looked fresh for decades and will continue to feel current for years to come. That makes it a smart investment for your beach house.
2. Bright Tropical Beach Kitchen: Colorful Coastal Design Ideas
Picture this: sunny yellow walls, turquoise bar stools, and a backsplash that reminds you of the Caribbean Sea. This bright tropical beach kitchen style is all about embracing color and letting your kitchen feel like a permanent vacation. If you love bold hues and energetic spaces, this is your coastal kitchen design.
The tropical beach kitchen approach works incredibly well in small spaces because the vibrant colors create such a strong focal point that people do not notice the compact square footage. Instead, they are drawn to the cheerful energy and playful personality of your colorful coastal kitchen. I absolutely love this style for beach houses where you want every day to feel celebratory.
Tropical Beach Kitchen Color Palette
Creating a cohesive tropical color scheme requires choosing colors that feel energetic without being overwhelming. Here are my proven color combinations:
Primary Colors: Sunny Brights
Sherwin Williams Lemon Twist (SW 6909) for a cheerful yellow
Benjamin Moore Dolphin's Cove (T10-18) for Caribbean turquoise
Behr Oceanside (HDC-CT-16) for a vibrant aqua blue
Use one as your dominant color (50 to 60 percent of the space)
Secondary Colors: Tropical Accents
Coral pink (use 20 to 30 percent for accents)
Lime green (sparingly, 10 to 15 percent)
Sunny orange (small pops in accessories)
Neutral Base: Keep It Light
White or cream cabinets (Benjamin Moore White Dove or Simply White)
Light wood tones for floors
This prevents the colors from overwhelming your small beach kitchen
How to Create This Tropical Beach Kitchen Look
Step 1: Choose Your Dominant Color
Pick one main color for maximum impact. I typically recommend painting one accent wall in a bold color like sunny yellow or turquoise rather than painting all four walls. This gives you the visual punch without making your small beach kitchen feel closed in. If you are feeling adventurous, paint your lower cabinets in a vibrant color while keeping upper cabinets white. This creates a fun two-tone look that feels grounded.
Step 2: Add a Colorful Backsplash
Your backsplash is the perfect place to introduce pattern and multiple colors. Consider these options:
Hand-painted Mexican or Mediterranean tiles in blues, yellows, and greens
Mosaic glass tiles that shimmer and reflect light
Peel-and-stick tile decals if you are renting or want a temporary solution (Etsy has amazing options)
Mix and match solid color tiles in a playful pattern
The backsplash should include at least two to three of your chosen colors to tie the whole tropical palette together.
Step 3: Bring in Colorful Furniture and Accessories
This is where you really have fun with your tropical beach kitchen design:
Turquoise or coral-colored bar stools (Target, Wayfair, and World Market have great affordable options)
Brightly patterned dish towels and pot holders
Colorful mixing bowls displayed on open shelves
A vibrant area rug with tropical patterns or geometric designs
Bold pendant lights in colors like aqua, yellow, or coral
Step 4: Layer with Tropical Patterns
Do not be afraid to mix patterns in this style. The key is keeping your color palette consistent:
Tropical leaf prints on curtains or roman shades
Geometric patterns on rugs or seat cushions
Striped dish towels in your color scheme
Fish or pineapple motifs on decorative elements
Stick to two to three patterns maximum, and vary the scale (one large pattern, one medium, one small) so they do not compete.

What to Avoid in Tropical Beach Kitchens
While this style celebrates color, there are pitfalls to avoid:
Using too many dark colors that make small beach kitchens feel cramped (stick with light, bright hues)
Going overboard with every tropical color (choose three to four main colors and stick with them)
Neglecting white space (your eyes need places to rest)
Cheap-looking plastic accessories that undermine the tropical elegance
Mixing warm and cool tones randomly (yellow and coral are warm, turquoise and aqua are cool, so choose one temperature as your primary)
DIY Project: Painted Furniture for Tropical Kitchen Style
Transform an old table, chairs, or small cabinet into a tropical statement piece. This project costs $40 to $60 and takes one afternoon.
Materials You Need:
Piece of wooden furniture (thrift store or your existing furniture)
120-grit and 220-grit sandpaper
Primer (if painting over dark wood or laminate)
Chalk paint or exterior-grade paint in your chosen tropical color
Clear polyurethane or furniture wax in matte or satin finish
Paintbrushes (2-inch angled brush works best)
Drop cloth or old sheets
Step-by-Step Instructions:
Start by cleaning your furniture piece thoroughly with soap and water. Let it dry completely. Sand the entire surface with 120-grit sandpaper to remove any existing finish and create a surface the paint can grip. Wipe away all dust with a damp cloth.
If you are painting over dark wood or laminate, apply one coat of primer and let it dry for 4 to 6 hours. This step is crucial for good color coverage and durability.
Apply your first coat of paint in long, even strokes. I love using chalk paint for furniture because it requires minimal prep and gives a beautiful matte finish. Let the first coat dry for 2 to 3 hours, then apply a second coat. For very bright colors like turquoise or coral, you might need a third coat for full coverage.
For a distressed beach cottage look, lightly sand the edges and high-traffic areas with 220-grit sandpaper after the paint dries. This reveals some of the wood underneath and creates that worn, beachy character.
Seal your painted furniture with two coats of clear polyurethane or furniture wax. This protects against moisture and daily wear, which is especially important in coastal climates. Let each coat dry completely (usually 24 hours) before using your furniture.
Skill Level: Beginner (perfect first furniture painting project) Time Required: 3 to 4 hours active work, plus drying time between coats Cost: $40 to $60 depending on furniture size and paint quality
Shopping List for Tropical Beach Kitchen
Paint and Finishes:
1 gallon tropical color paint for accent wall or cabinets
Primer if needed (1 quart usually sufficient)
Chalk paint or exterior paint for furniture project
Backsplash Materials:
Colorful peel-and-stick tiles (12 to 15 square feet for typical small kitchen backsplash)
OR hand-painted ceramic tiles (calculate based on your space)
Furniture and Seating:
2 to 3 colorful bar stools in turquoise, coral, or yellow ($50 to $150 each)
Small painted table or cabinet for added tropical personality
Textiles and Soft Goods:
4 to 5 dish towels in tropical colors and patterns
1 area rug with tropical or geometric design (2x3 or 3x5 feet)
Curtains or roman shades in tropical leaf print or solid bright color
Accessories and Decor:
Colorful mixing bowls or serving dishes
Tropical-themed artwork or prints
Bright pendant light or colorful lampshade
Fresh tropical flowers or plants (bird of paradise, anthurium, or philodendron)
Budget Breakdown for Tropical Kitchen Style
Budget-Friendly Update ($400 to $800):
Paint one accent wall yourself
Peel-and-stick backsplash tiles
DIY painted furniture project
Colorful textiles and small accessories
One or two affordable bar stools
Mid-Range Transformation ($1,500 to $3,500):
Professional cabinet painting in bold color
Quality ceramic tile backsplash installation
Three to four new colorful bar stools
New lighting fixtures
Custom window treatments in tropical prints
High-End Renovation ($4,000 to $7,000):
Custom two-tone cabinet refinishing
Hand-painted artisan tile backsplash
Designer furniture and lighting
Professional tropical mural or wallpaper accent wall
Premium tropical hardwood or bamboo flooring
Additional Styling Tips for Small Tropical Kitchens
Use glass-front cabinets to display your colorful dishes and glassware. This adds visual interest while keeping the space feeling open. The transparency prevents the cabinets from feeling heavy.
Incorporate live tropical plants wherever possible. A potted monstera, pothos, or palm adds authentic tropical vibes and improves air quality. Plants bring life and movement to your colorful beach kitchen.
Choose light fixtures with personality. Rattan pendant lights, colorful glass globes, or fixtures with tropical-inspired shapes become functional art in your kitchen. Lighting is often overlooked but makes a huge impact.
Keep your countertops relatively clear despite the colorful theme. Too many items on display creates visual chaos. Store most things away and only showcase a few beautiful colorful pieces.
Add a chalkboard or whiteboard painted in a fun color for grocery lists and meal planning. This functional element becomes part of your tropical decor when you choose yellow, turquoise, or coral paint.
Mix in metallic accents like brass or copper. These warm metals complement tropical colors beautifully and add a touch of sophistication that prevents the look from feeling too casual.
Why This Style Works for Small Beach House Kitchens
Bright tropical colors create such a strong visual statement that the small square footage becomes irrelevant. People notice the vibrant energy and personality, not the compact dimensions. The strategic use of white cabinets and light neutrals keeps the space from feeling cramped while the pops of color add all the excitement.
This tropical beach kitchen style also brings incredible mood-boosting benefits. Research shows that bright colors like yellow and turquoise increase energy and happiness. Your small beach kitchen becomes a space that genuinely makes you smile every time you walk in.
The tropical style is also highly customizable to your personal taste. You can go full Caribbean with yellows, turquoises, and coral, or take a more subtle approach with just aqua and white. The flexibility means you can dial the intensity up or down based on your comfort level with color.
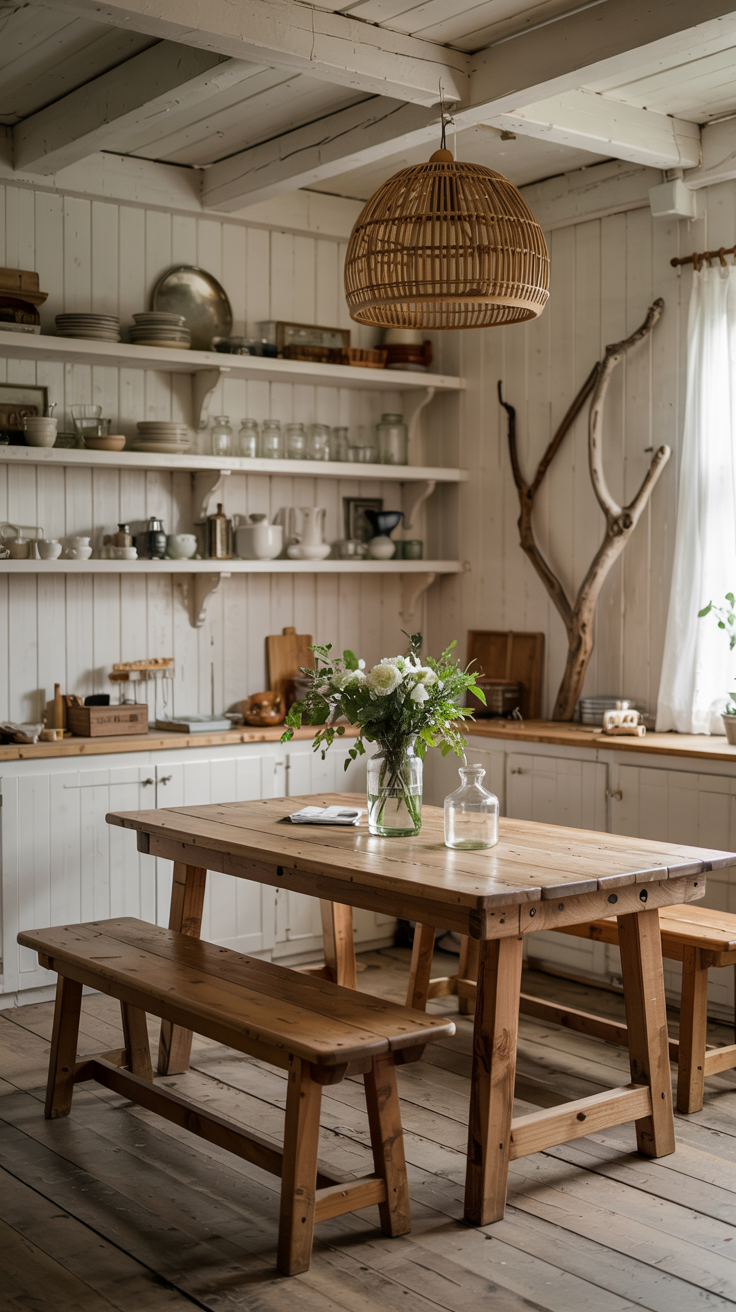
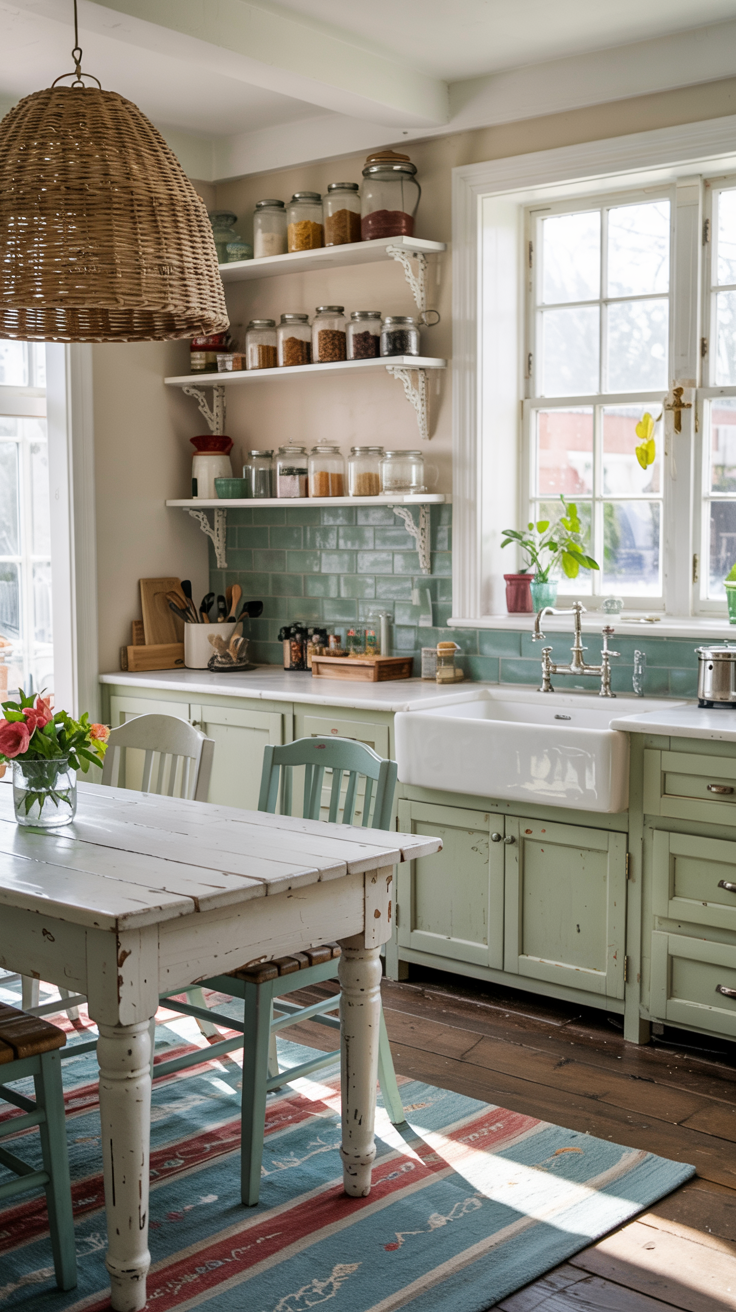
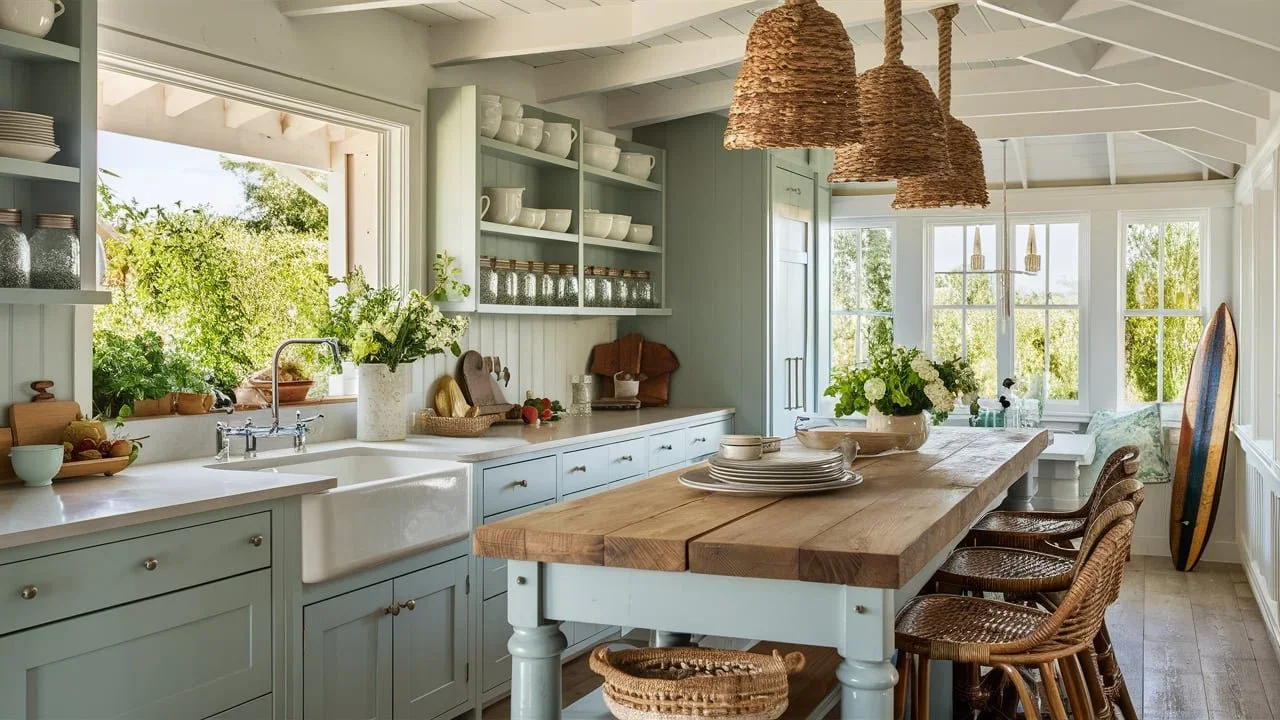
3. Rustic Coastal Farmhouse Kitchen: Shiplap Walls and Natural Textures
Picture this: shiplap walls, a farmhouse sink, and a beautiful mix of natural textures like jute, linen, and weathered wood. This rustic coastal farmhouse kitchen combines the best of coastal and farmhouse styles for a kitchen that feels warm, inviting, and effortlessly charming. It is my go-to recommendation for people who love that cozy cottage feel.
The rustic coastal farmhouse look has exploded in popularity over the past few years, and for good reason. It brings together the relaxed vibe of beach living with the comfortable, lived-in feel of farmhouse design. In small beach house kitchens, this style creates incredible warmth and character without feeling cluttered or overwhelming.
Rustic Coastal Farmhouse Color Palette
This style relies on soft, muted colors and lots of natural textures. Here is how to get it right:
Primary Colors: Soft Neutrals
Benjamin Moore White Dove (OC-17) for a warm white with subtle gray undertones
Sherwin Williams Alabaster (SW 7008) for walls and cabinets
Sherwin Williams Agreeable Gray (SW 7029) for a gentle gray-beige accent
Use whites and creams for 70 to 80 percent of the space
Accent Colors: Muted Coastal Tones
Soft sage green (use on lower cabinets or as accent color)
Weathered driftwood gray (for shelving and furniture)
Pale blue-gray like Benjamin Moore Palladian Blue (HC-144)
Use these for 20 to 30 percent, mostly in accessories and textiles
Natural Material Colors:
Honey-toned or natural wood (butcher block, shelving, beams)
Warm brass or oil-rubbed bronze (fixtures and hardware)
Natural jute, linen, and cotton (textiles and rugs)
How to Create This Rustic Farmhouse Beach Kitchen Look
Step 1: Install Shiplap or Beadboard Walls
Shiplap is the signature element of rustic coastal farmhouse kitchens. You can install real wood shiplap (pine boards are most affordable at $1 to $2 per linear foot) or use shiplap-look plywood panels for easier installation. I recommend covering at least one wall, though many people do all four walls in small beach kitchens.
Beadboard is another excellent option that creates vertical lines, making ceilings appear higher in compact spaces. You can install beadboard as wainscoting (lower third of the wall) or full wall coverage. Both shiplap and beadboard should be painted in your chosen warm white color.
Step 2: Choose Your Farmhouse Sink
The farmhouse sink (also called apron-front sink) is iconic in this style. Options include:
White fireclay sinks (classic choice, $400 to $800)
Stainless steel farmhouse sinks (more budget-friendly, $250 to $500)
Single bowl for small kitchens (30 to 33 inches wide)
Double bowl if you have more counter space (36 inches wide)
Pair your farmhouse sink with traditional bridge faucets or gooseneck faucets in brass, bronze, or brushed nickel finishes.
Step 3: Add Rustic Wood Elements
Natural wood brings essential warmth to coastal farmhouse kitchens:
Butcher block countertops in oak, maple, or walnut (seal properly for water resistance)
Reclaimed wood open shelving (8 to 12 inches deep, stained or left natural)
Wooden cutting boards displayed on the counter
Exposed ceiling beams if your architecture allows
Wood plank floors or wood-look tile for durability
The wood should look lived-in and authentic, not too polished or perfect. Embrace knots, grain variations, and natural character.
Step 4: Layer Farmhouse Lighting and Hardware
Lighting makes or breaks the rustic coastal farmhouse aesthetic:
Woven pendant lights in natural materials (rattan, wicker, or rope-wrapped)
Industrial-style pendants in black metal or aged brass
Mason jar light fixtures for authentic farmhouse charm
Lantern-style fixtures over islands or dining areas
For hardware, choose bin pulls and cup pulls in oil-rubbed bronze, antique brass, or matte black. These finishes have the rustic patina that fits this style perfectly.
What to Avoid in Rustic Coastal Farmhouse Kitchens
Keep your design authentic by avoiding these mistakes:
Too much distressing (a little goes a long way, overdoing it looks fake)
Modern chrome or polished nickel (stick with warmer, aged metal finishes)
Cold white paint colors (choose warm whites with cream or beige undertones)
Sleek, contemporary elements that clash with the rustic vibe
Synthetic materials that look cheap (invest in real wood, linen, and quality metals)
Too many farmhouse signs or cutesy decor (less is more for authenticity)
DIY Project: Custom Jute Rug for Coastal Farmhouse Kitchen
Create a budget-friendly natural fiber rug that adds warmth and texture. This project costs $30 to $50 and takes 2 to 3 hours.
Materials You Need:
Jute rope (1/4 inch thick, approximately 100 to 150 feet for a 3x2 foot rug)
Hot glue gun and 10 to 15 glue sticks
Scissors or utility knife
Non-slip rug pad (optional but recommended)
Cardboard or old towels to protect your work surface
Step-by-Step Instructions:
Start by creating the center of your rug. Take the end of your jute rope and begin coiling it into a tight spiral, securing it with hot glue as you go. Apply glue to about 3 to 4 inches of rope at a time, then press the next section of rope firmly against it. Work slowly and carefully to avoid burning your fingers.
Continue coiling the rope in a spiral pattern, adding hot glue every few inches to secure each new row to the previous one. Keep your coils as tight and even as possible for a professional look. The rug will naturally take on a circular or oval shape depending on how you coil it.
Keep adding rope in a spiral until your rug reaches your desired size. For a small kitchen rug, I recommend making it 2x3 feet or 3x4 feet. This gives you enough coverage in front of the sink without overwhelming your small beach kitchen.
When you reach your desired size, cut the rope at an angle and tuck the end underneath the rug. Secure it with extra hot glue. Flip the rug over and add additional glue to any loose sections on the back for extra durability.
Let your rug cure for 24 hours before placing it in your kitchen. Add a non-slip rug pad underneath to prevent sliding on tile or wood floors.
Skill Level: Beginner-friendly (great project for craft beginners) Time Required: 2 to 3 hours active work Cost: $30 to $50 depending on rope quantity and quality
Shopping List for Rustic Coastal Farmhouse Kitchen
Architectural Elements:
Shiplap or beadboard paneling (calculate square footage of walls)
Farmhouse sink in white fireclay or stainless steel (30 to 36 inches)
Wood for open shelving (pine or reclaimed wood, 8 to 10 feet total)
Countertops and Surfaces:
Butcher block countertop material (measure your counter space)
Wood stain and food-safe sealant if finishing yourself
Lighting and Hardware:
2 to 3 woven or industrial pendant lights
Cabinet hardware (bin pulls and cup pulls in oil-rubbed bronze or brass)
Bridge faucet or gooseneck faucet in coordinating finish
Textiles and Soft Goods:
Linen or cotton curtains in white, cream, or soft gray
Natural jute rug (or materials for DIY project)
Linen dish towels in neutral tones
Cotton or linen table runner
Storage and Display:
Woven baskets in various sizes (2 to 4 for open shelving)
White ceramic canisters or vintage glass jars
Wire baskets for produce storage
Wooden crates or boxes for additional storage
Budget Breakdown for Rustic Farmhouse Beach Kitchen
Budget-Friendly Update ($600 to $1,200):
DIY shiplap installation on one accent wall
Paint existing cabinets in warm white
DIY open shelving with pine boards
New farmhouse-style hardware
Woven pendant light and textiles
DIY jute rug
Mid-Range Transformation ($3,000 to $6,000):
Shiplap or beadboard on multiple walls (professional installation)
Farmhouse sink installation
Butcher block countertop section
Professional open shelving installation
Quality lighting package
Refinished or painted cabinets
High-End Renovation ($7,000 to $12,000):
Full shiplap walls throughout kitchen
Premium fireclay farmhouse sink with bridge faucet
Complete butcher block countertops
Custom reclaimed wood open shelving
Designer lighting fixtures
New farmhouse-style cabinetry
Wood plank flooring or high-quality wood-look tile
Additional Styling Tips for Rustic Coastal Farmhouse Kitchens
Display everyday items as decor. Wooden cutting boards, rolling pins, and vintage utensils in ceramic crocks become beautiful functional decor on your counters or open shelves.
Use vintage finds strategically. One or two authentic antique pieces (like an old scale, enamelware, or vintage canisters) add character without looking cluttered. Scout flea markets, estate sales, and antique shops for treasures.
Incorporate greenery through herbs and simple arrangements. Fresh herbs in terra cotta pots, eucalyptus branches in a ceramic pitcher, or a simple bouquet of white flowers fit perfectly in rustic coastal farmhouse kitchens.
Choose dishes wisely for open shelving. White ironstone, simple ceramics, or vintage dishes create cohesive displays. Mixing too many colors or patterns on open shelves looks chaotic.
Add texture through layering. Combine smooth white cabinets with rough wood shelving, soft linen curtains with woven baskets, and glossy tile with matte painted walls. These textural contrasts create depth and interest.
Keep metals consistent throughout. If you choose oil-rubbed bronze for your faucet and hardware, stick with it for light fixtures and accessories. Mixing too many metal finishes disrupts the cohesive farmhouse aesthetic.
Why This Style Works for Small Beach House Kitchens
The rustic coastal farmhouse look creates warmth and coziness that makes small beach kitchens feel intentionally intimate rather than cramped. The layered textures and natural materials add visual interest without requiring a lot of square footage.
The neutral color palette keeps small spaces feeling open and bright while the wood tones and natural fibers prevent that sterile all-white kitchen feeling. This balance is perfect for compact coastal kitchens where you need both functionality and charm.
This style also has incredible versatility. You can lean more coastal with lighter woods and blue-gray accents, or go more farmhouse with darker woods and green tones. The foundational elements (shiplap, farmhouse sink, natural materials) work beautifully with either direction.
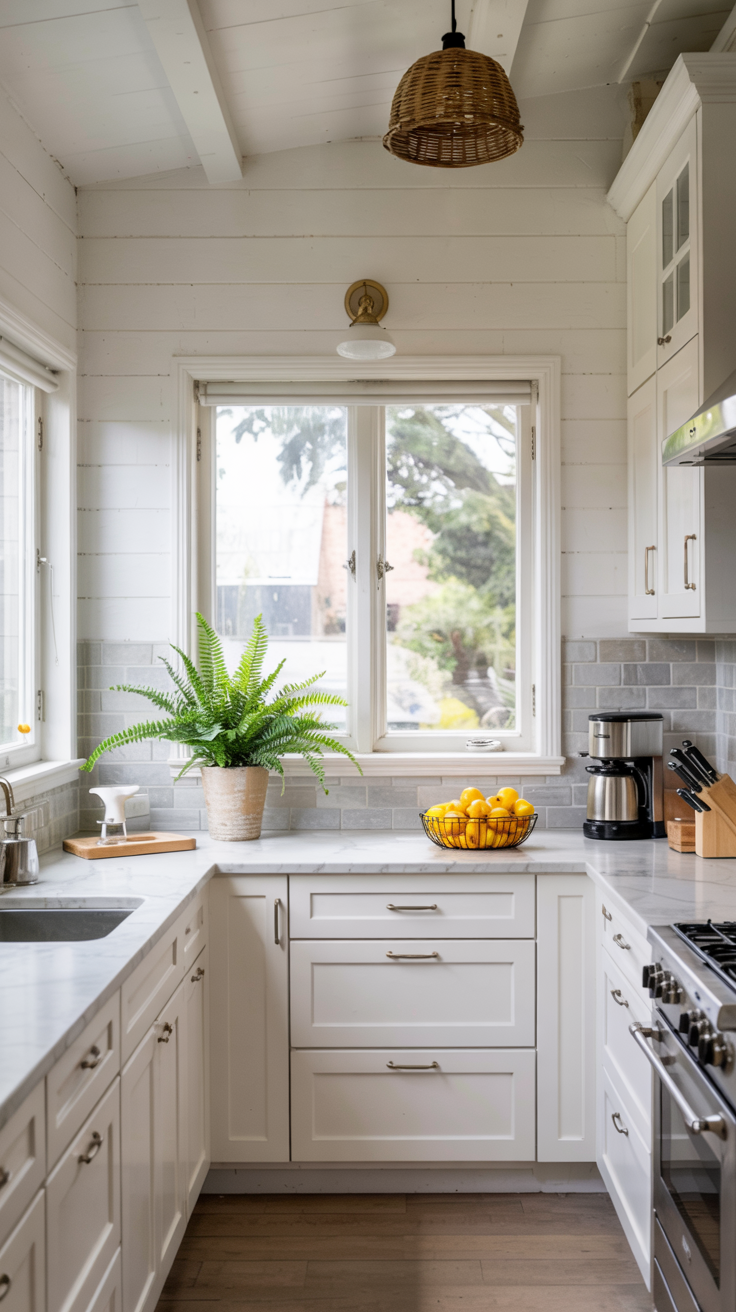
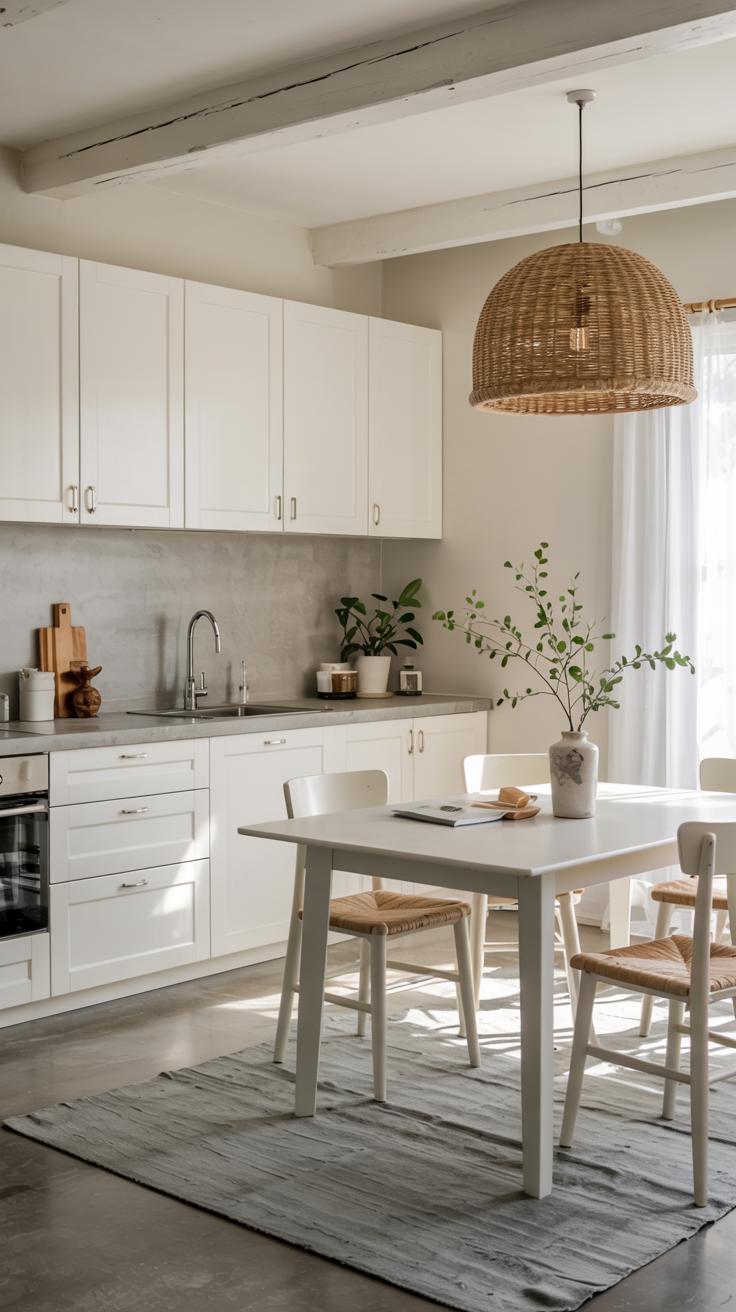
4. Minimalist Coastal Kitchen Design: Clean White and Modern Beach Style
Picture this: sleek white cabinets, stainless steel appliances, and just a few carefully chosen decor pieces. This minimalist coastal kitchen style is all about simplicity and letting natural light do the talking. If you crave calm, uncluttered spaces and appreciate modern design with coastal touches, this is your perfect beach kitchen aesthetic.
The minimalist approach works exceptionally well in small beach house kitchens because it maximizes the feeling of space. Every item has a purpose and a place, which makes your compact kitchen feel larger and more functional. I love this style for people who want a serene, spa-like atmosphere in their coastal homes.
Minimalist Coastal Color Palette
The minimalist coastal kitchen relies on a restrained color scheme that feels crisp and calming. Here is the formula:
Primary Color: Pure White
Benjamin Moore Chantilly Lace (OC-65) for the crispest, cleanest white
Sherwin Williams Extra White (SW 7006) for a true neutral white
Use white for 80 to 90 percent of the space (cabinets, walls, major elements)
Secondary Color: Soft Gray
Benjamin Moore Classic Gray (OC-23) for a warm gray
Sherwin Williams Repose Gray (SW 7015) for a cooler gray tone
Use gray for 10 to 15 percent (accents, one wall, or lower cabinets)
Accent Color: Muted Black
Matte black for hardware, light fixtures, or window frames
Use sparingly, 5 percent or less for maximum impact
Natural Elements:
Light wood tones (pale oak, whitewashed pine)
Natural linen and cotton in white or cream
Clear glass and acrylic for transparency
How to Create This Minimalist Beach Kitchen Look
Step 1: Choose Sleek, Simple Cabinetry
Minimalist coastal kitchens feature clean-lined cabinets without ornate details:
Flat-panel or slab-front cabinet doors (no raised panels or beading)
Handleless cabinets with push-to-open mechanisms for the ultimate minimal look
Integrated handles (finger pulls or edge pulls) as an alternative
High-gloss or matte white finish depending on your preference
If you are updating existing cabinets, removing hardware and installing push-to-open hinges transforms traditional cabinets into minimalist ones for around $100 to $200.
Step 2: Maximize Hidden Storage
The key to minimalist kitchens is keeping counters completely clear:
Deep drawers with internal organizers for pots, pans, and utensils
Pull-out pantry systems that maximize vertical storage
Appliance garages that hide small appliances when not in use
Under-sink organizers with pull-out systems
Toe-kick drawers that utilize every inch of space
Invest in quality storage solutions so everything has a designated home. This prevents clutter from accumulating on your beautiful minimal surfaces.
Step 3: Select Minimalist Coastal Accents
Less is truly more in this style, so choose your few decor pieces carefully:
One sculptural piece of driftwood art (simple geometric arrangement)
A single woven pendant light in natural materials
White ceramic or concrete containers for utensils
One or two green plants in simple white or concrete planters
Clear glass canisters for dry goods (the contents become the decor)
Each item should be beautiful and functional. Nothing is purely decorative in a minimalist coastal kitchen.
Step 4: Embrace Negative Space
White space (or negative space) is a design element in minimalist kitchens:
Leave countertops completely bare except for one coffee maker or stand mixer
Keep open shelving minimal (if you use it at all, display only 3 to 5 items per shelf)
Choose simple window treatments or leave windows bare
Resist the urge to fill empty wall space with art or shelving
The emptiness creates visual calm and makes your small beach kitchen feel spacious and peaceful.
What to Avoid in Minimalist Coastal Kitchens
Maintain the clean aesthetic by avoiding:
Colorful or patterned items that disrupt the monochromatic palette
Open shelving filled with many items (this reads as clutter, not minimalism)
Ornate or traditional hardware and fixtures
Too many small appliances on counters
Decorative items without function
Warm wood tones that feel country or rustic (stick with pale, cool-toned woods)
Busy backsplashes with lots of pattern or grout lines
DIY Project: Minimalist Driftwood Wall Art
Create a simple, sculptural piece that embodies minimalist coastal design. This project costs $15 to $25 and takes 1 hour.
Materials You Need:
3 to 5 pieces of driftwood in similar thickness but varying lengths (8 to 16 inches long)
White canvas or wooden board (12x16 inches or 16x20 inches)
White acrylic paint and small brush
Strong adhesive (E6000 or wood glue)
Sandpaper (220-grit)
Picture hanging hardware
Step-by-Step Instructions:
Clean your driftwood pieces thoroughly and let them dry. Sand any rough spots with 220-grit sandpaper. You want the wood smooth enough not to snag but keeping the natural texture and character.
Paint your canvas or wooden board with white acrylic paint. You might need two coats for complete coverage. Let it dry completely between coats (about 1 hour each).
Arrange your driftwood pieces on the painted surface in a pleasing geometric composition. I love creating a simple horizontal arrangement with pieces lined up parallel to each other, spaced evenly. You can also create an abstract geometric pattern or a minimalist triangle shape.
Once you are happy with your arrangement, use strong adhesive to attach each piece of driftwood to the board. Apply adhesive to the back of each piece and press firmly onto the surface. Let the adhesive cure for 24 hours before hanging.
Attach picture hanging hardware to the back of your canvas or board. Your minimalist driftwood art is ready to hang above your sink, stove, or on any blank wall in your coastal kitchen.
Skill Level: Beginner (very simple and forgiving) Time Required: 1 hour active work, plus drying and curing time Cost: $15 to $25 depending on materials
Shopping List for Minimalist Coastal Kitchen
Cabinets and Storage:
Push-to-open cabinet hinges if converting existing cabinets
Drawer organizers and dividers (measure your drawers)
Pull-out pantry systems or lazy Susans
Under-sink pull-out organizers
Surfaces and Finishes:
White cabinet paint in high-gloss or matte finish
White or light gray quartz countertops (if renovating)
Simple white subway tile or large-format tile backsplash
Lighting and Hardware:
1 to 2 minimalist pendant lights (simple geometric shapes in white, black, or natural materials)
Integrated cabinet pulls or push-to-open mechanisms
Minimal Decor:
1 piece of driftwood or sculptural art
1 to 2 plants in simple white or concrete planters
White ceramic utensil holder
Clear glass storage canisters (3 to 5 pieces)
Appliances:
Stainless steel or integrated appliances that blend with cabinets
Under-cabinet coffee maker or single high-quality appliance
Budget Breakdown for Minimalist Coastal Kitchen
Budget-Friendly Update ($400 to $900):
Paint cabinets white yourself
Install push-to-open hinges
Add drawer organizers
DIY driftwood art
Minimalist pendant light
Declutter and remove all unnecessary items
Mid-Range Transformation ($2,500 to $5,000):
Professional cabinet refinishing or new flat-panel doors
Quartz countertops
Simple tile backsplash
Quality integrated handles or push-to-open systems
New stainless steel appliances
Custom storage solutions
High-End Renovation ($6,000 to $10,000):
Custom minimalist cabinetry with integrated appliances
Premium quartz or marble countertops
Handleless cabinets with electronic push-to-open
Designer minimalist lighting
Professional organization systems throughout
Integrated sink and faucet systems
Additional Styling Tips for Minimalist Coastal Kitchens
Choose one material for countertops and backsplash to create seamless visual flow. White quartz that extends from counters up the backsplash eliminates visual breaks and makes small kitchens feel larger.
Invest in beautiful storage containers that can stay visible. Since minimalist kitchens keep things out of sight, the few items on display should be aesthetically pleasing. Glass canisters, white ceramic containers, and simple wooden boards all work beautifully.
Use lighting to create ambiance. Minimalist spaces need thoughtful lighting to avoid feeling cold. Layer ambient lighting, task lighting, and one statement pendant light for visual interest.
Keep a donation box accessible. Minimalism requires ongoing maintenance. When you acquire something new, remove something old. This prevents creep back into clutter.
Choose multi-functional items. In minimalist kitchens, everything earns its place through usefulness. A beautiful wooden cutting board serves as both prep surface and serving platter. A ceramic container holds utensils and looks sculptural on the counter.
Maintain surfaces obsessively. Minimalist coastal kitchens only work when counters stay clear. Make it a daily habit to wipe down and clear all surfaces before bed. This keeps the aesthetic intact.
Why This Style Works for Small Beach House Kitchens
Minimalist coastal kitchens are absolutely perfect for small spaces because they eliminate visual clutter that makes compact rooms feel cramped. When you remove unnecessary items and stick to a simple color palette, your small beach kitchen appears significantly larger and more open.
The emphasis on hidden storage means you can have all the functionality you need without sacrificing the clean aesthetic. Everything has a place behind closed doors, so your small kitchen works hard while looking effortlessly simple.
Natural light becomes the star in minimalist coastal spaces. Without competing decor and busy patterns, sunlight bounces off white surfaces and creates a bright, airy atmosphere. This is especially valuable in small beach house kitchens where maximizing light makes the space feel more expansive.
The calming simplicity also makes your kitchen a peaceful retreat. After a day at the beach or a busy week, you come home to a serene, uncluttered space that promotes relaxation. The minimal coastal aesthetic supports both productivity and peace of mind.
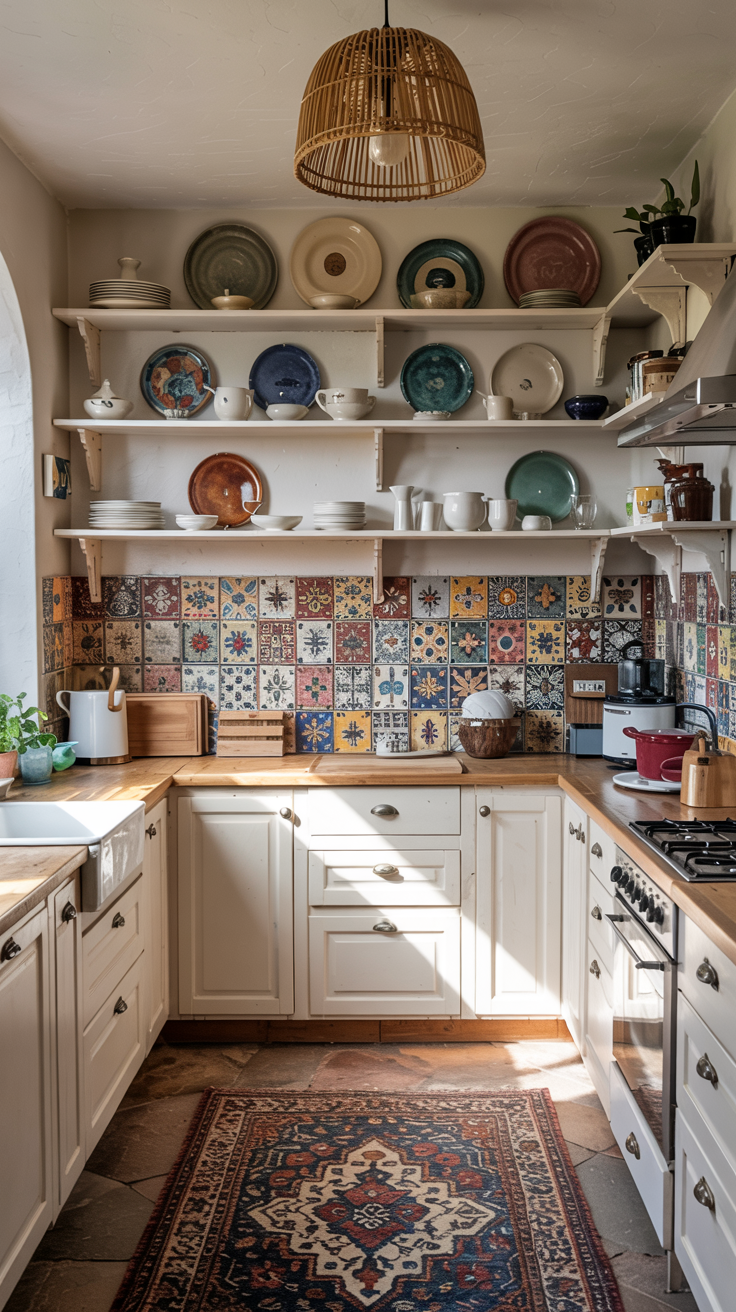
5. Eclectic Beach Kitchen Ideas: Mixing Patterns and Vintage Coastal Decor
Picture this: a vintage Turkish rug, colorful patterned tiles, hand-painted ceramics, and a mix of textures that somehow all work together beautifully. This eclectic beach kitchen style is perfect for creative souls who love collecting treasures over time and want their kitchen to tell a story. If you cannot commit to just one aesthetic, the eclectic coastal approach lets you blend your favorite elements into something uniquely yours.
The eclectic style celebrates personality and individuality, which makes it incredibly fun to create. Your small beach house kitchen becomes a curated collection of things you genuinely love rather than a cookie-cutter design. I adore this approach for people who enjoy thrifting, traveling, and bringing home special pieces that spark joy.
Eclectic Beach Kitchen Color Palette
The key to successful eclectic design is having a cohesive color palette even while mixing styles and patterns. Here is how to approach it:
Base Colors: Neutral Foundation
White or cream cabinets (Benjamin Moore White Dove or Sherwin Williams Alabaster)
Light neutral walls (soft gray, greige, or warm white)
Use neutrals for 50 to 60 percent of the space to ground your eclectic elements
Accent Colors: Coordinated Variety
Choose 3 to 4 colors that appear throughout different elements
Examples: terracotta, teal, mustard yellow, and coral
Or: navy blue, sage green, warm coral, and cream
These colors should appear in tiles, textiles, artwork, and accessories
Pattern Rules:
Vary the scale (one large pattern, one medium, one small)
Repeat your chosen colors across different patterns
Limit to 3 to 4 different patterns to maintain cohesion
How to Create This Eclectic Beach Kitchen Look
Step 1: Start with a Neutral Base
Eclectic kitchens need a calm foundation so the collected pieces can shine:
Paint cabinets white, cream, or soft gray
Choose simple neutral countertops (white quartz, butcher block, or concrete)
Keep walls in neutral tones
Select simple wood or tile flooring
This neutral backdrop prevents your eclectic elements from feeling chaotic or overwhelming in your small beach kitchen.
Step 2: Create a Statement Backsplash
Your backsplash is the perfect place to showcase personality in an eclectic coastal kitchen:
Mix and match patterned tiles in coordinating colors (Moroccan, Spanish, or Portuguese tiles work beautifully)
Create a patchwork effect with different tile designs
Combine solid colored tiles with patterned ones
Use vintage or reclaimed tiles for authentic character
You can source beautiful patterned tiles from specialty tile shops, Etsy sellers, or salvage yards. The imperfect, collected look is exactly what you want.
Step 3: Mix Furniture Styles and Eras
Eclectic beach kitchens celebrate mixing old and new:
Vintage wooden bar stools with modern metal legs
An antique farmhouse table with contemporary chairs
A retro refrigerator with sleek modern cabinets
Mid-century modern pendant lights with traditional cabinetry
The key is balancing proportions and ensuring pieces relate through color, material, or shape even if they are from different eras.
Step 4: Layer Patterns and Textiles
This is where eclectic style really shines:
Vintage Turkish or Moroccan rug with geometric patterns
Patterned dish towels in coordinating but different prints
Striped curtains or roman shades
Floral or botanical artwork
Mix of solid and patterned dishware on open shelves
Remember to repeat your core colors throughout different patterns so everything feels intentionally curated.
Step 5: Display Collections Thoughtfully
Eclectic kitchens often feature collections, but they need thoughtful arrangement:
Group similar items together (vintage bottles, colorful ceramics, copper pots)
Use odd numbers (groups of 3, 5, or 7 items)
Vary heights and shapes within groupings
Give collections dedicated spaces (one shelf, one wall area)
What to Avoid in Eclectic Beach Kitchens
While eclectic style is flexible, there are pitfalls to avoid:
Too many colors (stick to your 3 to 4 core accent colors)
No neutral breathing space (you need visual rest areas)
Patterns that share no common colors (everything should relate)
Collecting without editing (not every treasure belongs in your kitchen)
Ignoring scale (mixing only large patterns or only small ones looks flat)
Dark, heavy furniture that overwhelms small beach kitchens
Letting the space become a dumping ground for random items (eclectic is curated, not cluttered)
DIY Project: Custom Patterned Tile Backsplash
Create a unique eclectic backsplash using peel-and-stick tiles or permanent tiles if you own your home. This project costs $100 to $300 and takes one weekend.
Materials You Need:
Peel-and-stick decorative tiles in 3 to 5 coordinating patterns (calculate square footage needed)
Tile cutter or heavy-duty scissors (for peel-and-stick)
Level
Measuring tape
Pencil
Cleaning supplies for wall prep
Grout and grout tools (if using permanent tiles)
Step-by-Step Instructions for Peel-and-Stick Version:
Clean your backsplash area thoroughly with degreaser and let it dry completely. Any grease or residue will prevent tiles from adhering properly.
Plan your tile layout on paper first. I recommend creating a balanced pattern where each tile design appears multiple times throughout the backsplash. You might alternate patterns in a checkerboard style, create random placement with visual balance, or design horizontal or vertical stripes with different patterns.
Mark your starting point with a level line. I always start from the center and work outward to ensure symmetry. Measure and mark light pencil guidelines to keep your tiles straight.
Peel the backing from your first tile and press it firmly onto the wall, starting at your centerline. Smooth out any air bubbles with your hand or a credit card. Continue applying tiles according to your planned pattern, checking level frequently.
Use a tile cutter or heavy-duty scissors to trim tiles that need to fit around outlets, edges, or corners. Measure twice and cut once for accuracy.
For permanent tiles, follow the same planning process but use thin-set mortar to adhere tiles and grout between them after 24 hours of curing time. This requires more skill but creates a permanent, durable backsplash.
Skill Level: Intermediate for peel-and-stick, Advanced for permanent tiles Time Required: 4 to 6 hours for peel-and-stick, full weekend for permanent installation Cost: $100 to $150 for peel-and-stick, $200 to $300 for permanent tiles
Shopping List for Eclectic Beach Kitchen
Base Elements:
Neutral cabinet paint (white, cream, or soft gray)
Simple countertop material if renovating
Statement Pieces:
Patterned tiles for backsplash (15 to 25 square feet typically needed)
Vintage or eclectic area rug (2x3 or 3x5 feet)
Mix of bar stools or chairs in coordinating but different styles
Textiles and Patterns:
4 to 5 dish towels in coordinating patterns
Patterned or striped curtains
Table runner or placemats with pattern
Collected Items:
Vintage dishware or ceramics (thrift stores, estate sales)
Eclectic artwork or prints
Decorative bottles or pottery
Woven baskets in various shapes and sizes
Lighting and Hardware:
Mix of pendant lights (could be different styles in same finish)
Cabinet hardware in brass, copper, or mixed metals
Vintage or artisan light fixtures
Budget Breakdown for Eclectic Beach Kitchen
Budget-Friendly Update ($500 to $1,000):
Peel-and-stick patterned backsplash
Thrifted vintage finds and collected items
DIY painted cabinets
Vintage rug from estate sale or online marketplace
Mix of affordable textiles in coordinating patterns
One statement light fixture
Mid-Range Transformation ($2,000 to $4,000):
Permanent tile backsplash with mixed patterns
Quality vintage furniture pieces
Professional cabinet painting
Designer eclectic lighting
Curated collection of artisan ceramics and textiles
Custom window treatments
High-End Renovation ($5,000 to $8,000):
Custom artisan tile backsplash
Antique or designer vintage furniture
Mix of high-end and vintage elements
Professional styling and curation
Premium eclectic lighting collection
Designer textiles and artwork
Additional Styling Tips for Eclectic Beach Kitchens
Shop secondhand for authentic eclectic character. Estate sales, flea markets, antique shops, and online marketplaces like Chairish or Facebook Marketplace are treasure troves for unique pieces. The hunt is part of the fun in creating an eclectic coastal kitchen.
Create vignettes on open shelving. Instead of lining up items uniformly, create small styled arrangements that tell a story. Layer items at different heights, lean artwork behind objects, and mix functional items with decorative pieces.
Use trays to corral eclectic items. A vintage tray on your counter can hold an eclectic mix of salt and pepper shakers, oil bottles, and small plants while keeping the grouping visually contained.
Mix metals intentionally. Eclectic kitchens can successfully combine brass, copper, stainless steel, and black metal, but distribute each metal finish throughout the space rather than concentrating it in one area. This creates visual rhythm.
Edit ruthlessly over time. Eclectic style evolves as you find new treasures. When you bring something new home, evaluate whether something else should be removed or relocated. Your kitchen should feel curated, not cluttered.
Balance busy and calm areas. If you have a heavily patterned backsplash, keep counters relatively clear. If your rug is vibrant and busy, maybe your walls stay simple. This give-and-take prevents visual overwhelm in small beach kitchens.
Embrace imperfection. Eclectic coastal style celebrates the quirky, the handmade, and the imperfect. Chips, patina, and wear add character. Unlike minimalist or traditional styles, eclectic design welcomes the beautifully imperfect.
Why This Style Works for Small Beach House Kitchens
Eclectic beach kitchens work wonderfully in small spaces because they celebrate individuality and personality over square footage. The collected, layered look actually benefits from intimate spaces where you can appreciate the details and craftsmanship of each piece.
The mix-and-match approach is also budget-friendly and sustainable. You can build your eclectic coastal kitchen over time, adding pieces as you find them rather than purchasing everything at once. This makes the style accessible for any budget and prevents the cookie-cutter look of buying a complete coordinated set.
Small beach house kitchens with eclectic style feel warm, lived-in, and authentically yours. Every item has a story, whether it is a vintage find from a beach town antique shop, a handmade tile from your travels, or a thrifted treasure you refinished yourself. This personal connection makes your compact kitchen feel special and meaningful.
The eclectic approach also gives you incredible flexibility to change and evolve your style. Unlike committed single-style kitchens, you can swap out textiles, rearrange collections, and introduce new elements as your taste develops. Your small beach kitchen grows and changes with you.
Your Small Beach House Kitchen Transformation Starts Now
There you have it! Five proven ways to style your small beach house kitchen that actually work in real spaces. Whether you fell in love with the nautical neutrals, the bright and colorful tropical vibe, the rustic coastal farmhouse look, the clean minimalist aesthetic, or the eclectic mix of styles, you now have a complete roadmap to create your dream beach cottage kitchen.
I want you to remember something important. You absolutely do not need a huge budget or tons of square footage to design a coastal kitchen that feels like a permanent vacation. Small beach kitchens have incredible potential, and the strategies I shared today prove that style and function can coexist beautifully in compact spaces.
Your Action Plan: What to Do Next
Here's how I recommend getting started with your small beach house kitchen makeover:
This week:
Choose which of the five coastal kitchen styles resonates most with your personal taste
Measure your space and identify your biggest pain points (storage, lighting, counter space, etc.)
Create a Pinterest board with your favorite images from this post and similar beach kitchen inspiration
This month:
Pick one DIY project to tackle first (the driftwood shelf or painted furniture are great beginner options)
Start shopping for key pieces like new dish towels, a coastal rug, or decorative elements
Declutter your countertops and cabinets to create that open, airy beach house feel
Within three months:
Complete your chosen color palette updates (paint, backsplash, or cabinet refresh)
Add those finishing touches like coastal artwork, plants, and texture through natural materials
Step back and enjoy your beautiful new beach cottage kitchen!
Remember, decorating your small beach house kitchen is a marathon, not a sprint. Start with the changes that excite you most and build from there. Even small updates like swapping out hardware, adding open shelving, or bringing in coastal colors can make a dramatic difference.
I would absolutely love to hear how your beach kitchen transformation goes! If you try any of these small beach house kitchen ideas or DIY coastal projects, share your results. Your before and after photos might inspire someone else to finally tackle their own coastal kitchen makeover.
For more small beach house kitchen inspiration and step-by-step coastal decorating tutorials, check out my other beach cottage design guides. Happy decorating, and here's to creating a kitchen that makes every day feel like a beach day!
34 Coastal Cottage Kitchen Ideas That Look Expensive But Cost Under $200
Frequently Asked Questions (FAQs) About Small Beach House Kitchens
How do you make a small kitchen look beachy?
The key to making a small kitchen look beachy is focusing on light, airy colors and natural textures. I always start with a white or light neutral base on walls and cabinets to maximize the feeling of space. Then I layer in coastal elements like weathered wood, woven baskets, nautical blues, and natural fibers. Open shelving displays beach-inspired dishes and glassware, while simple touches like rope accents, driftwood decor, and sea glass colors instantly create that breezy beach house vibe. The secret is keeping it simple and uncluttered so your small beach kitchen feels spacious and relaxing.
What colors are best for a beach house kitchen?
The best colors for a beach house kitchen depend on your personal style, but I recommend starting with crisp whites and soft neutrals as your foundation. Classic coastal color palettes include white paired with navy blue for a nautical look, or white with aqua and turquoise for a tropical beach vibe. Soft sandy beiges, driftwood grays, and seafoam greens also work beautifully in beach cottage kitchens. For a bolder approach, sunny yellows and coral accents can bring that fun beach house energy. The most important thing is keeping your small beach kitchen feeling bright and airy, so stick with lighter shades as your dominant colors.
How can I maximize storage in a small coastal kitchen?
Maximizing storage in a small coastal kitchen requires smart solutions that look beautiful too. I love using open shelving because it provides storage while keeping the space feeling open and showcasing pretty beach-inspired dishes. Woven baskets on shelves hide clutter while adding coastal texture. Vertical storage is your best friend in small beach house kitchens, so install hooks for mugs, hanging racks for pots and pans, and utilize the space above cabinets. Pull-out organizers in lower cabinets, drawer dividers, and lazy Susans in corner cabinets help you use every inch efficiently. Multi-functional furniture like a kitchen island with built-in storage or a bench with hidden compartments also works wonders.
What is the difference between coastal and nautical kitchen styles?
Coastal and nautical kitchen styles are related but have distinct differences. Nautical kitchens embrace specific maritime elements like navy and white stripes, rope details, anchor motifs, and boat-inspired hardware. The look is more structured and traditionally tied to sailing and seafaring themes. Coastal kitchens take a broader, more relaxed approach inspired by beach life in general. This style includes softer colors like aqua and seafoam, natural textures like jute and linen, and organic elements like driftwood and shells. Coastal beach house kitchens feel more casual and can incorporate tropical, Mediterranean, or cottage influences, while nautical kitchens stick closer to classic maritime aesthetics.
Can you mix coastal styles in a small beach house kitchen?
Absolutely! Mixing coastal styles in a small beach house kitchen creates a personalized, collected-over-time look that feels authentic. I actually encourage combining elements from different coastal aesthetics to make your kitchen uniquely yours. You might pair rustic farmhouse shiplap walls with bright tropical bar stools, or combine minimalist white cabinets with eclectic colorful tile. The trick is maintaining a cohesive color palette so everything feels intentional rather than chaotic. In small beach kitchens especially, I recommend choosing two or three complementary styles and blending them thoughtfully. This approach gives you more design flexibility while still creating a harmonious coastal vibe.
How much does it cost to create a beach cottage kitchen on a budget?
Creating a beach cottage kitchen on a budget is absolutely doable, and costs vary widely based on your scope. Small cosmetic updates like painting cabinets, adding new hardware, installing peel-and-stick backsplash tiles, and updating light fixtures can transform your space for $500 to $1,500. Mid-range renovations including new countertops, open shelving, a farmhouse sink, and painted or refaced cabinets typically run $3,000 to $8,000 for small beach house kitchens. Many of my favorite coastal kitchen transformations focus on DIY projects, thrift store finds, and strategic updates rather than full renovations. Start with paint, decluttering, and adding coastal decor elements. These affordable changes make the biggest visual impact in small beach kitchens without breaking the bank.
What are the best materials for a beach house kitchen?
The best materials for a beach house kitchen balance durability with coastal aesthetics. I always recommend materials that can handle humidity and salt air if you are near the ocean. Quartz or sealed granite countertops resist moisture better than marble in coastal climates. For cabinets, painted wood or marine-grade plywood holds up well, and I love the look of white shaker-style cabinets in beach cottage kitchens. Natural materials like butcher block countertops, jute rugs, linen textiles, and woven baskets add warmth and texture. Ceramic or porcelain tile works beautifully for backsplashes and floors because it is water-resistant and easy to clean. Stainless steel or oil-rubbed bronze fixtures resist corrosion in salty environments while looking great in coastal kitchen designs.